
秒杀系统
<a href="#Result_73">自定义封装Result类</a>    <a href="#CodeMsg_140">自定义封装CodeMsg类</a>    <a href="#redisrabbit_214">集成redis和rabbit</a>    <a href="#RedisService_460">封装RedisService类</a>    <a href="#_681">断言和日志测试</a>      <a href="#Session_729">(二)实现用户登录和分布式Session</a>

<a href="#_732">数据表的设计</a>    <a href="#md5_754">md5工具类</a>    <a href="#_829">开发登录功能</a>

  <a href="#_872">自定义注解使用场景</a>      <a href="#_1028">全局异常处理器</a>         <a href="#Session_1167">实现分布式Session</a>    <a href="#cookietoken_1241">获取cookie中的token</a>    <a href="#token_1354">token鉴权开发</a>      <a href="#_1476">(三)秒杀开发</a>

<a href="#_1477">连表查询小技巧</a>    <a href="#_1539">秒杀功能实现逻辑(重点)</a>      <a href="#_1548">(四)秒杀压测</a>   <a href="#redis_1569">(五)页面级优化(加入redis缓存)</a>   <a href="#Rabbitmq_1653">(六)服务级优化(加入Rabbitmq)</a>

<a href="#SpringBootRabbitmq_1654">SpringBoot集成Rabbitmq</a>    <a href="#_1744">秒杀接口优化思路</a>

  <a href="#Redis_1752">库存预加载到Redis中</a>      <a href="#_1779">开始秒杀,预减库存</a>      <a href="#Direct_Exchange_1803">加入消息队列中(Direct Exchange)</a>      <a href="#_1820">消息发送过程</a>      <a href="#_1835">消息出队处理</a>      <a href="#_1857">秒杀方法</a>            <a href="#_1929">(七)图形验证码及恶意防刷</a>

<a href="#_1930">图形验证码</a>    <a href="#_1937">恶意防刷:动态秒杀地址</a>    <a href="#_1977">恶意防刷:接口限流</a>      <a href="#_2071">(八)面试题</a>

<a href="#1_Redis_2072">1. 库存预加载到Redis中是怎么实现的?</a>

  <a href="#11__2075">1.1 之后主动添加秒杀商品的话,怎么添加?</a>         <a href="#2_Redis_2078">2. 在Redis中扣减库存的时候,是怎么保证线程安全,防止超卖的?</a>    <a href="#3_Redis_2081">3. 如果出现Redis缓存雪崩、穿透,怎么解决?</a>    <a href="#4__2086">4. 限流防刷是怎么实现的?</a>    <a href="#5_URL_2091">5. 对于用户的恶意下单,他知道了你的URL地址,不停的刷,怎么办?</a>    <a href="#6__2094">6. 秒杀成功后是怎么同步到数据库中的?</a>

  <a href="#61__2097">6.1 减库存成功,创建秒杀订单失败了怎么办?</a>      <a href="#62_Spring_2100">6.2 Spring默认的事务隔离级别</a>         <a href="#7_RabbitMQ_2103">7. RabbitMQ怎么提高消息的高可用?</a>    <a href="#8_volatile_2106">8. 说说volatile关键字儿</a>    <a href="#9_TCPUDP_2109">9. TCP和UDP的区别</a>    <a href="#10_ArrayList_2113">10. ArrayList</a>
参考慕课网若鱼老师的教程,进行一些总结。
(一)搭建环境
使用springboot进行搭建,包管理工具使用maven。新建一个springboot工程,在pom文件中添加如下依赖
<dependencies>

   <dependency>
      <groupId>org.springframework.boot</groupId>
      <artifactId>spring-boot-starter-web</artifactId>
   </dependency>

   <dependency>
     <groupId>org.springframework.boot</groupId>
     <artifactId>spring-boot-starter-thymeleaf</artifactId>
    </dependency>

    <dependency>
    <groupId>org.mybatis.spring.boot</groupId>
    <artifactId>mybatis-spring-boot-starter</artifactId>
    <version>1.3.1</version>
    </dependency>

    <dependency>
        <groupId>mysql</groupId>
        <artifactId>mysql-connector-java</artifactId>
    </dependency>

    <dependency>
        <groupId>com.alibaba</groupId>
        <artifactId>druid</artifactId>
        <version>1.0.5</version>
    </dependency>

    <dependency>
    <groupId>redis.clients</groupId>
    <artifactId>jedis</artifactId>
    </dependency>

    <dependency>
    <groupId>com.alibaba</groupId>
    <artifactId>fastjson</artifactId>
    <version>1.2.38</version>
    </dependency>

    <dependency>
    <groupId>commons-codec</groupId>
    <artifactId>commons-codec</artifactId>
    </dependency>
    <dependency>
    <groupId>org.apache.commons</groupId>
    <artifactId>commons-lang3</artifactId>
    <version>3.6</version>
    </dependency>

    <dependency>
     <groupId>org.springframework.boot</groupId>
     <artifactId>spring-boot-starter-validation</artifactId>
   </dependency>

   <dependency>
        <groupId>org.springframework.boot</groupId>
        <artifactId>spring-boot-starter-amqp</artifactId>
    </dependency>

    <dependency>
        <groupId>org.springframework.boot</groupId>
        <artifactId>spring-boot-starter-amqp</artifactId>
    </dependency>

  </dependencies>
自定义封装Result类
一般而言,后端是返回给前端Json数据,其数据类型常见为code,msg,data。因此自己定义封装好的一个result类,后续的数据都使用该类进行返回给前端。
这里使用了泛型技术:支持传入不同类型的 data
总结一下这个result类的作用:在成功和失败的时候用于结果的返回,其中引入了CodeMsg,自定义状态码和信息。
package com.imooc.miaosha.result;

public class Result<T> {

    private int code;
    private String msg;
    private T data;

    /**
     *  成功时候的调用:返回data数据
     * */
    public static  <T> Result<T> success(T data){
        return new Result<T>(data);
    }

    /**
     *  失败时候的调用:返回code和msg(封装了CodeMsg类)
     * */
    public static  <T> Result<T> error(CodeMsg codeMsg){
        return new Result<T>(codeMsg);
    }

    private Result(T data) {
        this.data = data;
    }

    private Result(int code, String msg) {
        this.code = code;
        this.msg = msg;
    }

    // 引入了 CodeMsg,自定义状态码和信息
    private Result(CodeMsg codeMsg) {
        if(codeMsg != null) {
            this.code = codeMsg.getCode();
            this.msg = codeMsg.getMsg();
        }
    }


    public int getCode() {
        return code;
    }
    public void setCode(int code) {
        this.code = code;
    }
    public String getMsg() {
        return msg;
    }
    public void setMsg(String msg) {
        this.msg = msg;
    }
    public T getData() {
        return data;
    }
    public void setData(T data) {
        this.data = data;
    }
}
自定义封装CodeMsg类
提前定义好可能出现的信息,便于传递给result类(不然result类中的一个一个写code和msg,麻烦死了)
package com.imooc.miaosha.result;

public class CodeMsg {

    private int code;
    private String msg;

    //通用的错误码
    public static CodeMsg SUCCESS = new CodeMsg(0, "success");
    public static CodeMsg SERVER_ERROR = new CodeMsg(500100, "服务端异常");
    public static CodeMsg BIND_ERROR = new CodeMsg(500101, "参数校验异常:%s");
    public static CodeMsg REQUEST_ILLEGAL = new CodeMsg(500102, "请求非法");
    public static CodeMsg ACCESS_LIMIT_REACHED= new CodeMsg(500104, "访问太频繁!");
    //登录模块 5002XX
    public static CodeMsg SESSION_ERROR = new CodeMsg(500210, "Session不存在或者已经失效");
    public static CodeMsg PASSWORD_EMPTY = new CodeMsg(500211, "登录密码不能为空");
    public static CodeMsg MOBILE_EMPTY = new CodeMsg(500212, "手机号不能为空");
    public static CodeMsg MOBILE_ERROR = new CodeMsg(500213, "手机号格式错误");
    public static CodeMsg MOBILE_NOT_EXIST = new CodeMsg(500214, "手机号不存在");
    public static CodeMsg PASSWORD_ERROR = new CodeMsg(500215, "密码错误");


    //商品模块 5003XX


    //订单模块 5004XX
    public static CodeMsg ORDER_NOT_EXIST = new CodeMsg(500400, "订单不存在");

    //秒杀模块 5005XX
    public static CodeMsg MIAO_SHA_OVER = new CodeMsg(500500, "商品已经秒杀完毕");
    public static CodeMsg REPEATE_MIAOSHA = new CodeMsg(500501, "不能重复秒杀");
    public static CodeMsg MIAOSHA_FAIL = new CodeMsg(500502, "秒杀失败");


    private CodeMsg( ) {
    }

    private CodeMsg( int code,String msg ) {
        this.code = code;
        this.msg = msg;
    }

    public int getCode() {
        return code;
    }
    public void setCode(int code) {
        this.code = code;
    }
    public String getMsg() {
        return msg;
    }
    public void setMsg(String msg) {
        this.msg = msg;
    }

    public CodeMsg fillArgs(Object... args) {
        int code = this.code;
        // 用于格式化填充后的参数:this.msg中的参数会被args填充
        String message = String.format(this.msg, args);
        return new CodeMsg(code, message);
    }

    @Override
    public String toString() {
        return "CodeMsg [code=" + code + ", msg=" + msg + "]";
    }


}
集成redis和rabbit
在云服务器上使用docker安装redis和rabbit,注意云服务器上开通redis和rabbitmq(包括管理页面端)的端口,在redis和rabbit中分别去修改配置文件,然后使用rdm连接redis测试,登录rabbitmq管理页面端测试。
贴出application.properties代码
#thymeleaf 配置信息,默认走tempaltes下的html
spring.thymeleaf.prefix=classpath:/templates/
spring.thymeleaf.suffix=.html
spring.thymeleaf.cache=false
spring.thymeleaf.content-type=text/html
spring.thymeleaf.enabled=true
spring.thymeleaf.encoding=UTF-8
spring.thymeleaf.mode=HTML5
# mybatis 配置信息,定义mapperLocations位置,防止包结果不同找不到xml
mybatis.type-aliases-package=com.imooc.miaosha.domain
mybatis.configuration.map-underscore-to-camel-case=true
mybatis.configuration.default-fetch-size=100
mybatis.configuration.default-statement-timeout=3000
mybatis.mapperLocations = classpath:com/imooc/miaosha/dao/*.xml
# druid 使用德鲁伊数据库连接池,初始使用本地数据库连接
spring.datasource.url=jdbc:mysql://localhost:3306/miaosha?useUnicode=true&characterEncoding=utf-8&allowMultiQueries=true&useSSL=false
spring.datasource.username=root
spring.datasource.password=javan1996
spring.datasource.driver-class-name=com.mysql.jdbc.Driver
spring.datasource.type=com.alibaba.druid.pool.DruidDataSource
spring.datasource.filters=stat
spring.datasource.maxActive=1000
spring.datasource.initialSize=100
spring.datasource.maxWait=60000
spring.datasource.minIdle=500
spring.datasource.timeBetweenEvictionRunsMillis=60000
spring.datasource.minEvictableIdleTimeMillis=300000
spring.datasource.validationQuery=select 'x'
spring.datasource.testWhileIdle=true
spring.datasource.testOnBorrow=false
spring.datasource.testOnReturn=false
spring.datasource.poolPreparedStatements=true
spring.datasource.maxOpenPreparedStatements=20
#redis
redis.host=114.132.248.249
redis.port=6379
redis.timeout=10
#redis.password=123456
redis.poolMaxTotal=1000
redis.poolMaxIdle=500
redis.poolMaxWait=500
#static 配置静态缓存,可以将页面缓存到浏览器中
spring.resources.add-mappings=true
spring.resources.cache-period= 3600
spring.resources.chain.cache=true
spring.resources.chain.enabled=true
spring.resources.chain.gzipped=true
spring.resources.chain.html-application-cache=true
spring.resources.static-locations=classpath:/static/
#rabbitmq
spring.rabbitmq.host=114.132.248.249
spring.rabbitmq.port=5672
spring.rabbitmq.username=guest
spring.rabbitmq.password=guest
spring.rabbitmq.virtual-host=/
#\u6D88\u8D39\u8005\u6570\u91CF
spring.rabbitmq.listener.simple.concurrency= 10
spring.rabbitmq.listener.simple.max-concurrency= 10
#\u6D88\u8D39\u8005\u6BCF\u6B21\u4ECE\u961F\u5217\u83B7\u53D6\u7684\u6D88\u606F\u6570\u91CF
spring.rabbitmq.listener.simple.prefetch= 1
#\u6D88\u8D39\u8005\u81EA\u52A8\u542F\u52A8
spring.rabbitmq.listener.simple.auto-startup=true
#\u6D88\u8D39\u5931\u8D25\uFF0C\u81EA\u52A8\u91CD\u65B0\u5165\u961F
spring.rabbitmq.listener.simple.default-requeue-rejected= true
#\u542F\u7528\u53D1\u9001\u91CD\u8BD5
spring.rabbitmq.template.retry.enabled=true
spring.rabbitmq.template.retry.initial-interval=1000
spring.rabbitmq.template.retry.max-attempts=3
spring.rabbitmq.template.retry.max-interval=10000
spring.rabbitmq.template.retry.multiplier=1.0
pringboot使用jedis连接redis,采用连接池思想,所以要创建JedisPool。
先写RedisConfig类,读取properties文件的信息(类属性和properties文件信息吻合),要加注解
@ConfigurationProperties(prefix=“redis”),表示读取前缀配置信息
package com.imooc.miaosha.redis;

import org.springframework.boot.context.properties.ConfigurationProperties;
import org.springframework.stereotype.Component;

@Component
@ConfigurationProperties(prefix="redis")
public class RedisConfig {
    private String host;
    private int port;
    private int timeout;//秒
    private String password;
    private int poolMaxTotal;
    private int poolMaxIdle;
    private int poolMaxWait;//秒
    public String getHost() {
        return host;
    }
    public void setHost(String host) {
        this.host = host;
    }
    public int getPort() {
        return port;
    }
    public void setPort(int port) {
        this.port = port;
    }
    public int getTimeout() {
        return timeout;
    }
    public void setTimeout(int timeout) {
        this.timeout = timeout;
    }
    public String getPassword() {
        return password;
    }
    public void setPassword(String password) {
        this.password = password;
    }
    public int getPoolMaxTotal() {
        return poolMaxTotal;
    }
    public void setPoolMaxTotal(int poolMaxTotal) {
        this.poolMaxTotal = poolMaxTotal;
    }
    public int getPoolMaxIdle() {
        return poolMaxIdle;
    }
    public void setPoolMaxIdle(int poolMaxIdle) {
        this.poolMaxIdle = poolMaxIdle;
    }
    public int getPoolMaxWait() {
        return poolMaxWait;
    }
    public void setPoolMaxWait(int poolMaxWait) {
        this.poolMaxWait = poolMaxWait;
    }
}
然后创建JedisPool,使用工厂模式去生成jedisPool,因此建立一个工厂类JedisPoolFactory
package com.imooc.miaosha.redis;

import org.springframework.beans.factory.annotation.Autowired;
import org.springframework.context.annotation.Bean;
import org.springframework.stereotype.Service;

import redis.clients.jedis.JedisPool;
import redis.clients.jedis.JedisPoolConfig;

@Service
public class RedisPoolFactory {

    @Autowired
    RedisConfig redisConfig;

    @Bean
    public JedisPool JedisPoolFactory() {
        JedisPoolConfig poolConfig = new JedisPoolConfig();
        poolConfig.setMaxIdle(redisConfig.getPoolMaxIdle());
        poolConfig.setMaxTotal(redisConfig.getPoolMaxTotal());
        poolConfig.setMaxWaitMillis(redisConfig.getPoolMaxWait() * 1000);
        JedisPool jp = new JedisPool(poolConfig, redisConfig.getHost(), redisConfig.getPort(),
   redisConfig.getTimeout()*1000, redisConfig.getPassword(), 0);
        return jp;
    }

}
到此为止redis的基本配置完成了
redis是key-value数据库,key很容易冲突,也就是说我们需要取定义key的前缀,防止key冲突。这个前缀修饰采用的模板方法模式的应用。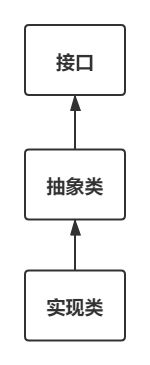
先定义接口KeyPrefix:获得失效时间和获取前缀
package com.imooc.miaosha.redis;

public interface KeyPrefix {

    public int expireSeconds();

    public String getPrefix();

}
再定义一个抽象类BasePrefix ,去实现接口。这个抽象类就是一个模板了,后续的实现类都是实现该模板。
package com.imooc.miaosha.redis;

public abstract class BasePrefix implements KeyPrefix{

    // 过期时间 0-永不过期  其它-过期的秒数
    private int expireSeconds;
    // 传入的前缀名,真实的redis前缀应该是类名+传入的前缀名
    private String prefix;

    public BasePrefix(String prefix) {//0代表永不过期
        this(0, prefix);
    }

    public BasePrefix( int expireSeconds, String prefix) {
        this.expireSeconds = expireSeconds;
        this.prefix = prefix;
    }

    public int expireSeconds() {//默认0代表永不过期
        return expireSeconds;
    }

    // 获取真实的前缀名
    public String getPrefix() {
        // 获取类名
        String className = getClass().getSimpleName();
        // 类名拼接传入的前缀名 == redis真实前缀
        return className+":" + prefix;
    }

}
最后就是定义具体业务的实现类了,这里举个例子,定义一个用户前缀名实现类UserKey
package com.imooc.miaosha.redis;

public class UserKey extends BasePrefix{

    // 调用父类构造函数,默认是永不过期
    private UserKey(String prefix) {
        super(prefix);
    }
    // 定义id的前缀名, 当前类名:id == user  其实就是  UserKey:id
    public static UserKey getById = new UserKey("id");
    // 定义name的前缀名, 当前类名类名:id   其实就是  UserKey:name
    public static UserKey getByName = new UserKey("name");
}
接下来就是去定义redis服务类,这个服务类其实就是去操作redis数据,核心就是:获取redis对象,设置redis对象,增加key,减少key,判断key是否存在…
其中获取redis对象,设置redis对象使用了stringtobean技术和beantostring技术,这两个重点关注!(用到了json和java对象互相转换的技术)
封装RedisService类
package com.imooc.miaosha.redis;

import java.util.ArrayList;
import java.util.List;

import org.springframework.beans.factory.annotation.Autowired;
import org.springframework.stereotype.Service;

import com.alibaba.fastjson.JSON;

import redis.clients.jedis.Jedis;
import redis.clients.jedis.JedisPool;
import redis.clients.jedis.ScanParams;
import redis.clients.jedis.ScanResult;

@Service
public class RedisService {

    @Autowired
    JedisPool jedisPool;

    /**
     * 获取当个对象,Class<T> clazz 表示的是value的类型
     * */
    public <T> T get(KeyPrefix prefix, String key,  Class<T> clazz) {
         Jedis jedis = null;
         try {
   jedis =  jedisPool.getResource();
   //生成真正的key
   String realKey  = prefix.getPrefix() + key;
   String  str = jedis.get(realKey);
   T t =  stringToBean(str, clazz);
   return t;
         }finally {
    returnToPool(jedis);
         }
    }

    /**
     * 设置对象:set方法,我们需要将value值转换为String类型,让Redis能够识别
     * 不然那么多类型,redis无法识别啊,只能使用string过渡一下
     * */
    public <T> boolean set(KeyPrefix prefix, String key,  T value) {
         Jedis jedis = null;
         try {
   jedis =  jedisPool.getResource();
   String str = beanToString(value);
   if(str == null || str.length() <= 0) {
    return false;
   }
            //生成真正的key
   String realKey  = prefix.getPrefix() + key;
   int seconds =  prefix.expireSeconds();
   if(seconds <= 0) {
   // 不设置过期时间
    jedis.set(realKey, str);
   }else {
   // 设置过期时间
    jedis.setex(realKey, seconds, str);
   }
   return true;
         }finally {
    returnToPool(jedis);
         }
    }

    /**
     * 判断key是否存在
     * */
    public <T> boolean exists(KeyPrefix prefix, String key) {
         Jedis jedis = null;
         try {
   jedis =  jedisPool.getResource();
            //生成真正的key
   String realKey  = prefix.getPrefix() + key;
            return  jedis.exists(realKey);
         }finally {
    returnToPool(jedis);
         }
    }

    /**
     * 删除
     * */
    public boolean delete(KeyPrefix prefix, String key) {
         Jedis jedis = null;
         try {
   jedis =  jedisPool.getResource();
            //生成真正的key
            String realKey  = prefix.getPrefix() + key;
            long ret =  jedis.del(realKey);
            return ret > 0;
         }finally {
    returnToPool(jedis);
         }
    }

    /**
     * 增加值
     * */
    public <T> Long incr(KeyPrefix prefix, String key) {
         Jedis jedis = null;
         try {
   jedis =  jedisPool.getResource();
            //生成真正的key
   String realKey  = prefix.getPrefix() + key;
            return  jedis.incr(realKey);
         }finally {
    returnToPool(jedis);
         }
    }

    /**
     * 减少值
     * */
    public <T> Long decr(KeyPrefix prefix, String key) {
         Jedis jedis = null;
         try {
   jedis =  jedisPool.getResource();
            //生成真正的key
   String realKey  = prefix.getPrefix() + key;
            return  jedis.decr(realKey);
         }finally {
    returnToPool(jedis);
         }
    }

    public boolean delete(KeyPrefix prefix) {
        if(prefix == null) {
            return false;
        }
        List<String> keys = scanKeys(prefix.getPrefix());
        if(keys==null || keys.size() <= 0) {
            return true;
        }
        Jedis jedis = null;
        try {
            jedis = jedisPool.getResource();
            jedis.del(keys.toArray(new String[0]));
            return true;
        } catch (final Exception e) {
            e.printStackTrace();
            return false;
        } finally {
            if(jedis != null) {
   jedis.close();
            }
        }
    }

    public List<String> scanKeys(String key) {
        Jedis jedis = null;
        try {
            jedis = jedisPool.getResource();
            List<String> keys = new ArrayList<String>();
            String cursor = "0";
            ScanParams sp = new ScanParams();
            sp.match("*"+key+"*");
            sp.count(100);
            do{
   ScanResult<String> ret = jedis.scan(cursor, sp);
   List<String> result = ret.getResult();
   if(result!=null && result.size() > 0){
       keys.addAll(result);
   }
   //再处理cursor
   cursor = ret.getStringCursor();
            }while(!cursor.equals("0"));
            return keys;
        } finally {
            if (jedis != null) {
   jedis.close();
            }
        }
    }

    public static <T> String beanToString(T value) {
        if(value == null) {
            return null;
        }
        Class<?> clazz = value.getClass();
        if(clazz == int.class || clazz == Integer.class) {
   return ""+value;
        }else if(clazz == String.class) {
   return (String)value;
        }else if(clazz == long.class || clazz == Long.class) {
            return ""+value;
        }else {
            return JSON.toJSONString(value);
        }
    }

    @SuppressWarnings("unchecked")
    public static <T> T stringToBean(String str, Class<T> clazz) {
        if(str == null || str.length() <= 0 || clazz == null) {
   return null;
        }
        if(clazz == int.class || clazz == Integer.class) {
   return (T)Integer.valueOf(str);
        }else if(clazz == String.class) {
   return (T)str;
        }else if(clazz == long.class || clazz == Long.class) {
            return  (T)Long.valueOf(str);
        }else {
            return JSON.toJavaObject(JSON.parseObject(str), clazz);
        }
    }

    private void returnToPool(Jedis jedis) {
         if(jedis != null) {
   jedis.close();
         }
    }

}
接下来自己写一个测试类去调用redisservice的方法,然后在rdm查看相关的信息,验证一下!!!
这里我使用了springboot的测试类,同时使用logger日志和断言技术
断言和日志测试
package com.imooc.miaosha.redis;


import com.sun.scenario.effect.impl.sw.sse.SSEBlend_SRC_OUTPeer;
import org.junit.After;
import org.junit.Assert;
import org.junit.Before;
import org.junit.Test;
import org.junit.runner.RunWith;
import org.slf4j.Logger;
import org.slf4j.LoggerFactory;
import org.springframework.beans.factory.annotation.Autowired;
import org.springframework.boot.test.context.SpringBootTest;
import org.springframework.test.context.junit4.SpringRunner;

@RunWith(SpringRunner.class)
@SpringBootTest
public class RedisServiceTest {

   @Autowired
   private RedisService redisService;

   private static final Logger logger = LoggerFactory.getLogger(RedisServiceTest.class);
   @Before
   public void init() {
      System.out.println("开始测试-----------------");
   }

   @Test
   public void testSetkey(){
      Assert.assertSame(true,redisService.set(UserKey.getById,""+1,100));
      System.out.println("111111111");
      logger.info("测试结束");
   }

   @After
   public void after() {
      System.out.println("测试结束-----------------");
   }

}


测试成功!
rabbitmq涉及到后期的优化,后续再记录!
(二)实现用户登录和分布式Session
前面环境搭好了,现在要开始设计数据库了!!!
我们要做的业务是秒杀业务,但是在实际中商品的售卖活动不当当有秒杀,还有有节假日的优惠活动等等,因此要把秒杀封装解耦成单独的业务。
数据表的设计
常见的电商交易必备的数据表有:商品表、订单表、用户表,在上面的基础上增加秒杀业务,也就是增加了秒杀商品表,秒杀订单表,秒杀用户表
接下来就是思考数据库主键的选择了,使用mysql的自增id?UUID?还是雪花算法?
在实际的业务场景中要使用不同的数据库主键,贴出一个链接,对应各自的适用场景,总结一句话就是:单实例或者单节点组使用子增id,小规模的分布式场景下使用uuid,大规模的分布式场景下使用雪花算法构造的全局自增id作为主键。本次秒杀系统设计自然就是选择了mysql自增id了
数据库主键的对比
在实际的数据库设计过程中,一般先思考uml用例图和e-r图,这样写字段就毫无压力。
商品表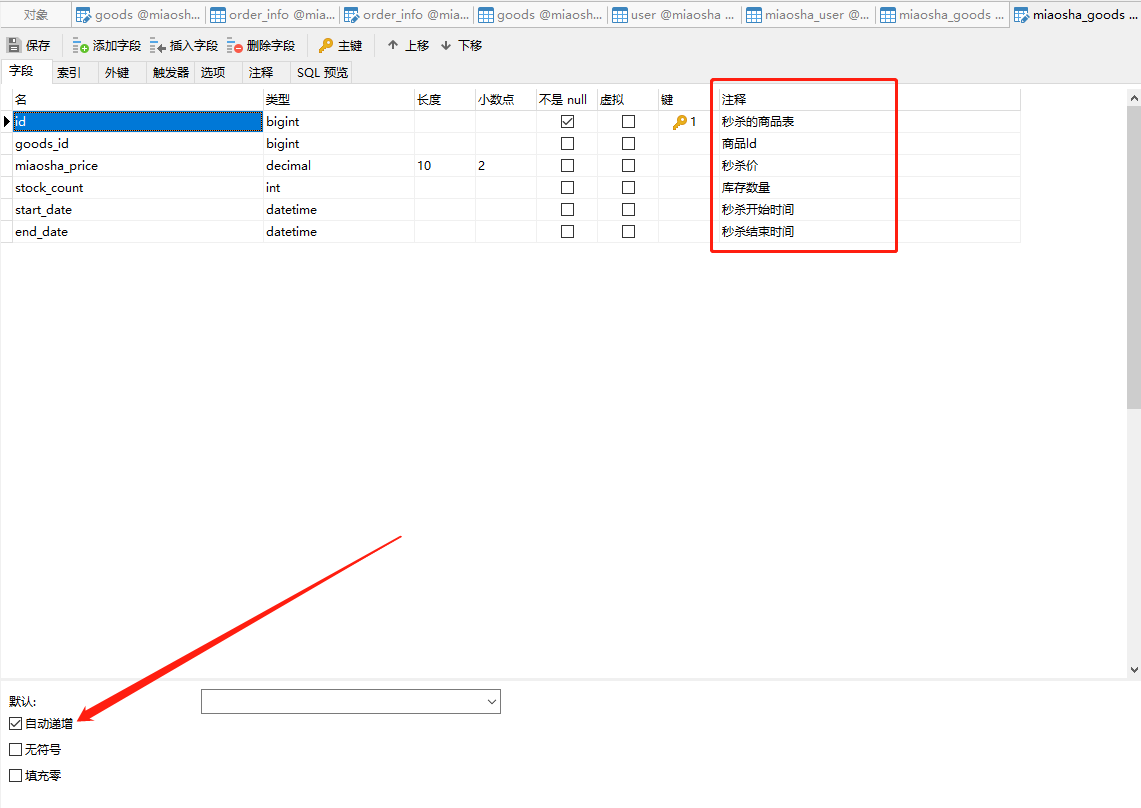
秒杀商品表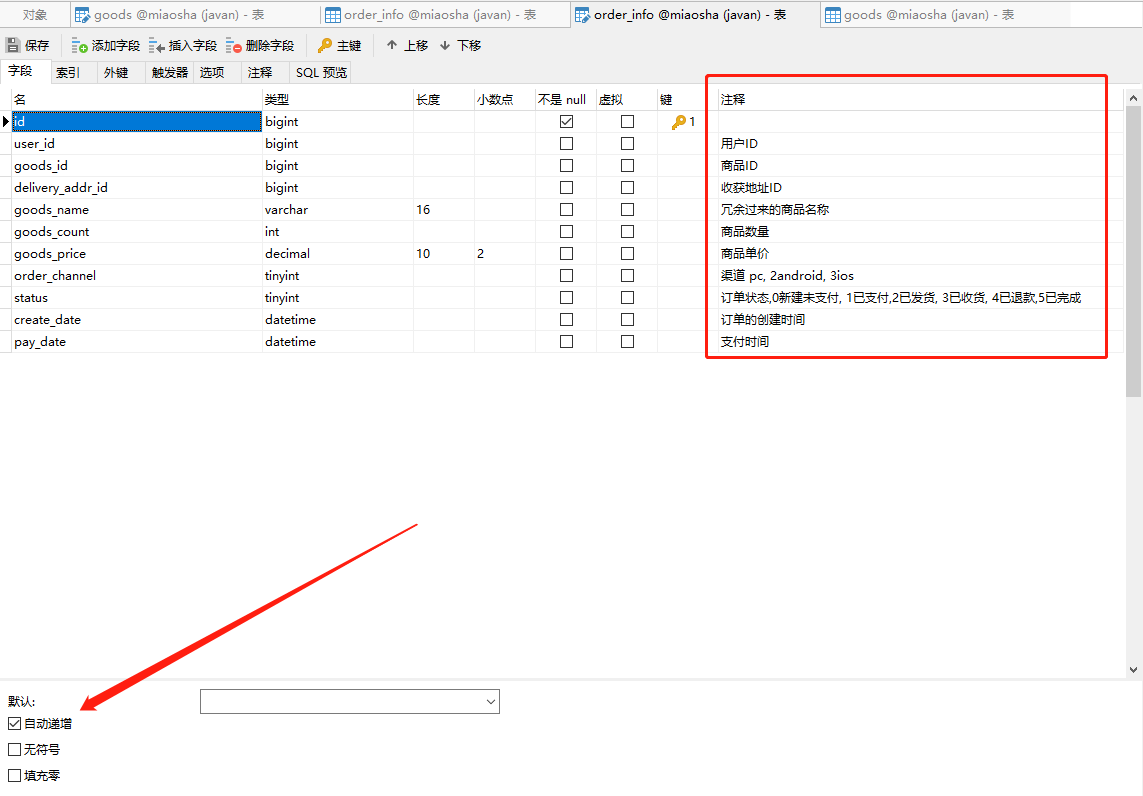
订单表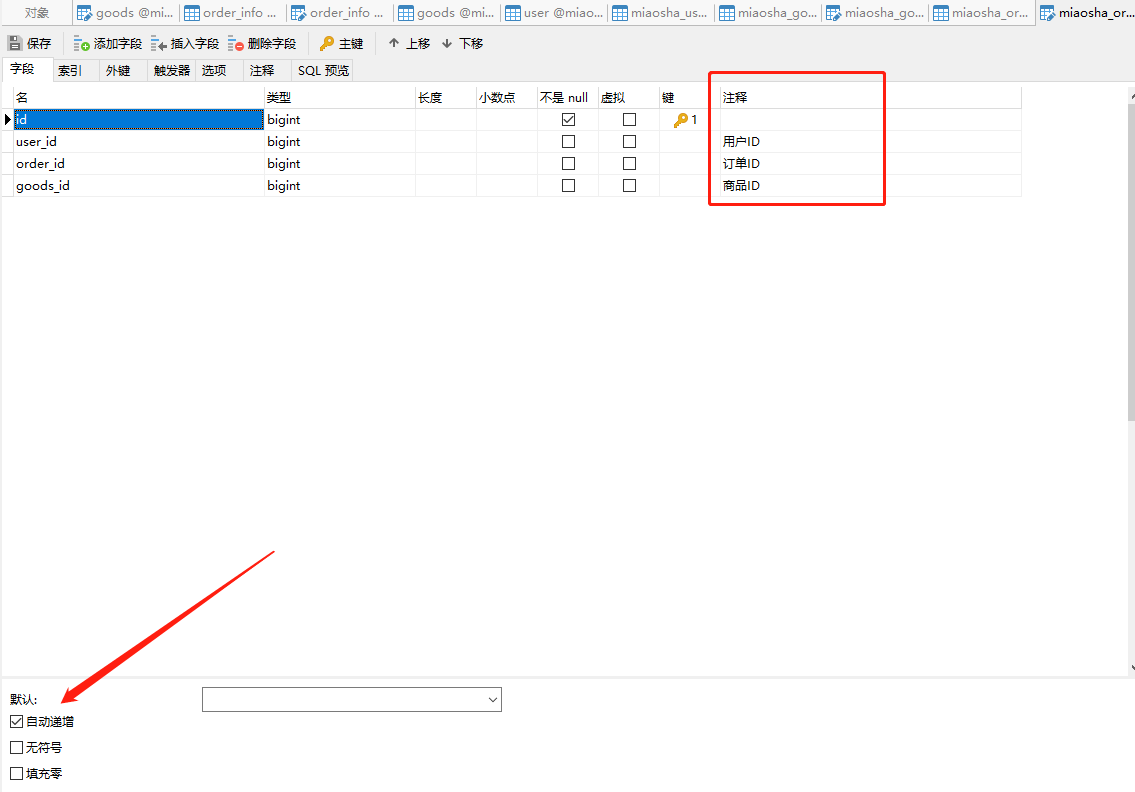
秒杀订单表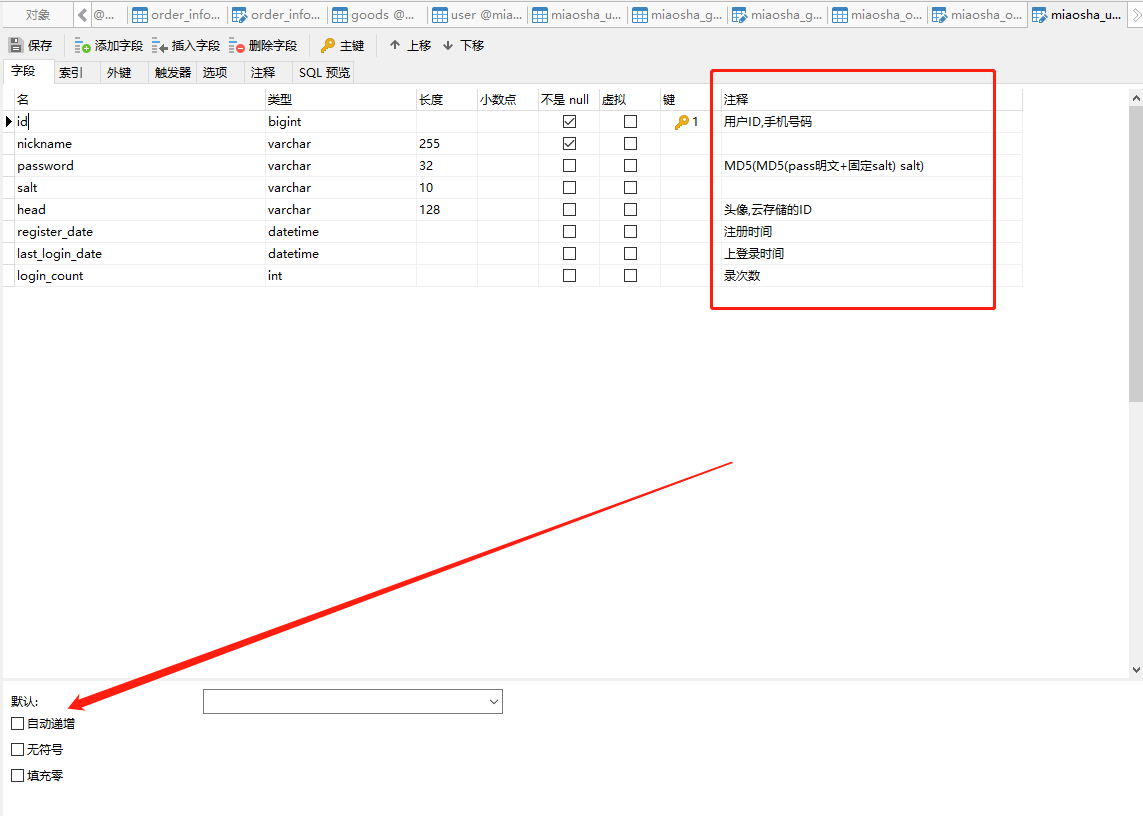
秒杀用户表
所有的数据库表请写上注释!!!
注意:秒杀用户表的id是使用手机号码的,因此不能使用自增id了。表的设计过程中储存图像一般是用相对路径(储存前端的static下)或者七牛云的云储存路径(完整的http链接)。用户表的密码一般是md5加密过的。比较常见的是单次md5加密,但是一旦后端代码和数据库落入黑客手中(前端可以看到js代码),就可以根据md5反查表得到密码,所以这里使用了两次md5加密。
第一次md5:传输安全加密(http明文传递),(Password1 = MD5(inputPassword,固定的salt值),salt为字符串)
第二次md5:数据库安全加密,(Password2 = MD5(Password1,随机的salt值))
字符集采用的是utf8mb4
md5工具类
pom导入md的依赖包和常见的工具类包
      <dependency>
         <groupId>commons-codec</groupId>
         <artifactId>commons-codec</artifactId>
      </dependency>
      <dependency>
         <groupId>org.apache.commons</groupId>
         <artifactId>commons-lang3</artifactId>
         <version>3.6</version>
      </dependency>
package com.imooc.miaosha.util;

import org.apache.commons.codec.digest.DigestUtils;

public class MD5Util {
    //静态的salt,用于第一次MD5
    public static String md5(String src) {
        //调用DigestUtils,实现md5处理
        return DigestUtils.md5Hex(src);
    }

    private static final String salt = "1a2b3c4d";

    /**
     * 第一次md5
     * @param inputPass
     * @return
     */
    public static String inputPassToFormPass(String inputPass) {
        String str = ""+salt.charAt(0)+salt.charAt(2) + inputPass +salt.charAt(5) + salt.charAt(4);
        System.out.println(str);
        return md5(str);
    }

    /**
     * 第二次md5
     * @param formPass
     * @param salt
     * @return
     */

    public static String formPassToDBPass(String formPass, String salt) {
        String str = ""+salt.charAt(0)+salt.charAt(2) + formPass +salt.charAt(5) + salt.charAt(4);
        return md5(str);
    }

    /**
     * 整合两次md5加密
     * @param inputPass
     * @param saltDB
     * @return
     */
    public static String inputPassToDbPass(String inputPass, String saltDB) {
        String formPass = inputPassToFormPass(inputPass);
        String dbPass = formPassToDBPass(formPass, saltDB);
        return dbPass;
    }
    // 测试main函数
    public static void main(String[] args) {
        System.out.println(inputPassToFormPass("123456"));//d3b1294a61a07da9b49b6e22b2cbd7f9
//        System.out.println(formPassToDBPass(inputPassToFormPass("123456"), "1a2b3c4d"));
//        System.out.println(inputPassToDbPass("123456", "1a2b3c4d"));//b7797cce01b4b131b433b6acf4add449
    }

}
接下来就是常见的三层mvc架构了,图省事的话,可以使用easycode插件右击数据库表,生成三层架构。
这里要注意,domain/entity对应的是数据库的字段类型,实际上前后端数据交互有可能只需要domain/entity的部分字段,甚至要扩展字段,这时候怎么办?新增一个vo层(view object)用户视图的数据交互,前端传数据给后端,后端返回数据给前端(封装到result类中的data中)
开发登录功能
首先写一个LoginVo(使用手机号和密码进行登录),这里使用了validation包中的注解@NotNull等等
package com.imooc.miaosha.vo;

import javax.validation.constraints.NotNull;

import org.hibernate.validator.constraints.Length;

import com.imooc.miaosha.validator.IsMobile;

public class LoginVo {

    @NotNull
    @IsMobile
    private String mobile;

    @NotNull
    @Length(min=32)
    private String password;

    public String getMobile() {
        return mobile;
    }
    public void setMobile(String mobile) {
        this.mobile = mobile;
    }
    public String getPassword() {
        return password;
    }
    public void setPassword(String password) {
        this.password = password;
    }
    @Override
    public String toString() {
        return "LoginVo [mobile=" + mobile + ", password=" + password + "]";
    }
}
上面还使用了一个自定义注解:@IsMobile,怎么去自定义注解呢???
首先建一个包:annoation/valiation(名字合理即可),创建一个注解类,一般包括 require、message、group、payload字段信息(上面的注解去抄一下@Notnull的注解)
自定义注解使用场景
package com.imooc.miaosha.validator;

import static java.lang.annotation.ElementType.ANNOTATION_TYPE;
import static java.lang.annotation.ElementType.CONSTRUCTOR;
import static java.lang.annotation.ElementType.FIELD;
import static java.lang.annotation.ElementType.METHOD;
import static java.lang.annotation.ElementType.PARAMETER;
import static java.lang.annotation.RetentionPolicy.RUNTIME;

import java.lang.annotation.Documented;
import java.lang.annotation.Retention;
import java.lang.annotation.Target;

import javax.validation.Constraint;
import javax.validation.Payload;

@Target({ METHOD, FIELD, ANNOTATION_TYPE, CONSTRUCTOR, PARAMETER })
@Retention(RUNTIME)
@Documented
@Constraint(validatedBy = {IsMobileValidator.class })
public @interface  IsMobile {

    boolean required() default true;

    String message() default "手机号码格式错误";

    Class<?>[] groups() default { };

    Class<? extends Payload>[] payload() default { };
}
注意:@Constraint(validatedBy = {IsMobileValidator.class })限制了该注解的实现方法
接下来就是去实现这个手机号码验证器类了IsMobileValidator
package com.imooc.miaosha.validator;
import  javax.validation.ConstraintValidator;
import javax.validation.ConstraintValidatorContext;

import org.apache.commons.lang3.StringUtils;

import com.imooc.miaosha.util.ValidatorUtil;

public class IsMobileValidator implements ConstraintValidator<IsMobile, String> {

    private boolean required = false;

    // 初始化方法,它调用的是我们自定义注解中写的required()方法,默认需要有值
    public void initialize(IsMobile constraintAnnotation) {
        required = constraintAnnotation.required();
    }

    //isValid,则对逻辑进行验证,true验证通过,false验证失败
    public boolean isValid(String value, ConstraintValidatorContext context) {
        if(required) {
        // 调用自己写的工具类
            return ValidatorUtil.isMobile(value);
        }else {
            if(StringUtils.isEmpty(value)) {
   return true;
            }else {
   return ValidatorUtil.isMobile(value);
            }
        }
    }

}
期间再写一个判断手机号码的工具类ValidatorUtil (手机号码是11位,这里使用了正则表达式)
唉!~上面的操作为了造一个@Ismobile注解轮子,花费了这么多功夫,简直有点麻烦!!!
但是一般而言注解是用在两个场景:
自定义注解+拦截器 实现登录校验 和 自定义注解+AOP 实现日志打印
上面的操作注解属实有点冗余,不是实际开发的方向…(我直接使用自定义注解+拦截器 实现登录校验,这样子不香嘛????何必再单独做一个@IsMobile的注解小轮子呢)
注解的使用场景
package com.imooc.miaosha.util;

import java.util.regex.Matcher;
import java.util.regex.Pattern;

import org.apache.commons.lang3.StringUtils;

public class ValidatorUtil {

    private static final Pattern mobile_pattern = Pattern.compile("1\\d{10}");

    public static boolean isMobile(String src) {
        if(StringUtils.isEmpty(src)) {
            return false;
        }
        Matcher m = mobile_pattern.matcher(src);
        return m.matches();
    }

//    public static void main(String[] args) {
//            System.out.println(isMobile("18912341234"));
//            System.out.println(isMobile("1891234123"));
//    }
}
然后在controller层的doLogin方法加上JSR验证,@Valid注解即可生效
package com.imooc.miaosha.controller;

import javax.servlet.http.HttpServletResponse;
import javax.validation.Valid;

import org.slf4j.Logger;
import org.slf4j.LoggerFactory;
import org.springframework.beans.factory.annotation.Autowired;
import org.springframework.stereotype.Controller;
import org.springframework.web.bind.annotation.RequestMapping;
import org.springframework.web.bind.annotation.ResponseBody;

import com.imooc.miaosha.redis.RedisService;
import com.imooc.miaosha.result.Result;
import com.imooc.miaosha.service.MiaoshaUserService;
import com.imooc.miaosha.vo.LoginVo;

@Controller
@RequestMapping("/login")
public class LoginController {

    private static Logger log = LoggerFactory.getLogger(LoginController.class);

    @Autowired
    MiaoshaUserService userService;

    @Autowired
    RedisService redisService;

   @RequestMapping("/to_login")
   public String toLogin() {
      return "login";
   }

   @RequestMapping("/do_login")
   @ResponseBody
   // 记得加上@Valid,这样validation包才会生效
   public Result<String> doLogin(HttpServletResponse response, @Valid LoginVo loginVo) {
       log.info(loginVo.toString());
       //登录
       String token = userService.login(response, loginVo);
       return Result.success(token);
   }
}
全局异常处理器
思考如下代码:
   public CodeMsg login(LoginVo loginVo){
      if(loginVo == null){
         return CodeMsg.SERVER_ERROR;
      }

      String mobile = loginVo.getMobile();
      String password = loginVo.getPassword();
      //判断手机号是否存在
      MiaoShaUser user = getById(Long.parseLong(mobile));
      if(user == null){
         return CodeMsg.MOBILE_NOT_EXIST;
      }

      //验证密码
      String DBPass = user.getPassword();
      //这里对前端来的密码第二次MD5处理
      String formPassToDBPass = MD5Util.formPassToDBPass(password, user.getSalt());
      if(!formPassToDBPass.equals(DBPass)){
         return CodeMsg.PASSWORD_ERROR;
      }

      return CodeMsg.SUCCESS;
   }
它的返回值是CodeMsg,而在业务中,方法对应的返回值应该是确切的,我们登陆,返回应该为 true 或 false,所以,我们要对这里进行优化
   public boolean login(LoginVo loginVo){
      if(loginVo == null){
         throw new GlobalException(CodeMsg.SERVER_ERROR);
      }

      String mobile = loginVo.getMobile();
      String password = loginVo.getPassword();
      //判断手机号是否存在
      MiaoShaUser user = getById(Long.parseLong(mobile));
      if(user == null){
         throw new GlobalException(CodeMsg.MOBILE_NOT_EXIST);
      }

      //验证密码
      String DBPass = user.getPassword();
      //这里对前端来的密码第二次MD5处理
      String formPassToDBPass = MD5Util.formPassToDBPass(password, user.getSalt());
      if(!formPassToDBPass.equals(DBPass)){
         throw new GlobalException(CodeMsg.PASSWORD_ERROR);
      }

      return true;
   }
我们可以发现,对应的参数验证,并没有返回值,而是直接抛出异常,而且我们也将返回值进行了修改,执行到方法的最后,能够返回ture
新建一个exception包,定义全局异常类GlobalException (实际上就是继承RuntimeException,封装了返回信息codemsg)
package com.imooc.miaosha.exception;

import com.imooc.miaosha.result.CodeMsg;

public class GlobalException extends RuntimeException{

    private static final long serialVersionUID = 1L;

    private CodeMsg cm;

    public GlobalException(CodeMsg cm) {
    // RuntimeException类的构造函数,抛出异常信息
        super(cm.toString());
        this.cm = cm;
    }

    public CodeMsg getCm() {
        return cm;
    }

}
定义全局异常处理器GlobalExceptionHandler
package com.imooc.miaosha.exception;

import java.util.List;

import javax.servlet.http.HttpServletRequest;

import org.springframework.validation.BindException;
import org.springframework.validation.ObjectError;
import org.springframework.web.bind.annotation.ControllerAdvice;
import org.springframework.web.bind.annotation.ExceptionHandler;
import org.springframework.web.bind.annotation.ResponseBody;

import com.imooc.miaosha.result.CodeMsg;
import com.imooc.miaosha.result.Result;

/**
 * 只能处理 controller 层抛出的异常,对例如 Interceptor(拦截器)层的异常、定时任务中的异常、异步方法中的异常,不会进行处理。
 *
 * 以上就是用 @ControllerAdvice + @ExceptionHand 实现 SpringBoot 中捕获 controller 层全局异常并处理的方法。
 * 像工具类中或者其他类中的异常,拦截异常可以使用aop操作。
 *
 */
//定义该类为全局异常处理类。
@ControllerAdvice
@ResponseBody
public class GlobalExceptionHandler {
    //定义该方法为异常处理方法。value 的值为需要处理的异常类的 class 文件。
    @ExceptionHandler(value=Exception.class)
    public Result<String> exceptionHandler(HttpServletRequest request, Exception e){
        e.printStackTrace();
        if(e instanceof GlobalException) {
            // 属于全局异常
            GlobalException ex = (GlobalException)e;
            return Result.error(ex.getCm());
        }else if(e instanceof BindException) {
            // 属于绑定异常
            BindException ex = (BindException)e;
            List<ObjectError> errors = ex.getAllErrors();
            ObjectError error = errors.get(0);
            String msg = error.getDefaultMessage();
            // 按照格式输出绑定异常的信息
            return Result.error(CodeMsg.BIND_ERROR.fillArgs(msg));
        }else {
            // 否则统一输出服务端异常
            return Result.error(CodeMsg.SERVER_ERROR);
        }
    }
}
实现分布式Session
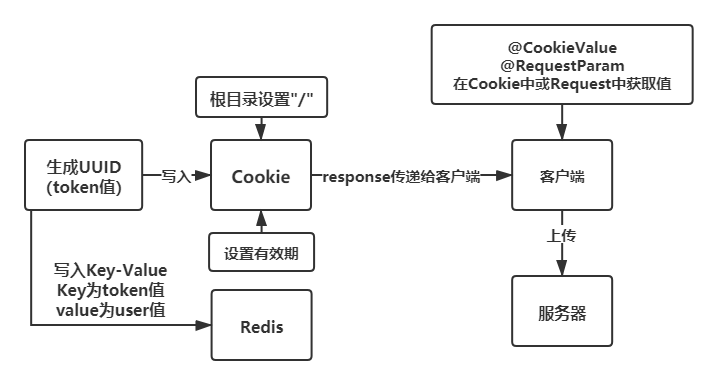
作用:用Redis存储Session值,在Redis中通过token值来获取用户信息
每次登陆,将Session的过期时间进行修正:
Session值固定过期时间为30min,要在每次登陆的时候,以当前时间继续顺延30分钟
我们的解决方法就是,每次登陆时,重新再添加一次Cookie,则能够完成时间延长
   private void addCookie(HttpServletResponse response, MiaoShaUser user, String token) {
       //首次登陆的时候,需要将Cookie存入Redis
      // MiaoShaUserKey.token 是自定义的redis key前缀
      redisService.set(MiaoShaUserKey.token,token,user);
      // public static final String COOKI_NAME_TOKEN = "token";
      Cookie cookie = new Cookie(COOKIE_NAME_TOKEN, token);
      // 每次都更新过期时间,过期时间为2天,3600*24 * 2
      cookie.setMaxAge(MiaoShaUserKey.token.expireSeconds());
      //设置为根目录,则可以在整个应用范围内使用cookie
      cookie.setPath("/");
      // 增加cookie
      response.addCookie(cookie);
   }
上面的流程图中解释了,每次客户端都携带cookie访问服务端,服务端提取cookie中的token值验证用户信息。
那么获取Cookie值的两种方式:
@RequestMapping("test")
public String test(ModelMap mm, HttpServletResponse response) {
    // 在response中存入Cookie
   response.addCookie(new Cookie("name", "value"));
   return "test";
}

@RequestMapping("/getCookie")
public String getCookie(@CookieValue("name")String name, HttpServletRequest request) {
    // 方式一: 通过request获取Cookie数组,然后循环
   Cookie[] cookies = request.getCookies();
   for (Cookie item : cookies) {
      System.out.println(item.getName()+":"+item.getValue());
   }
   // 方式二: 直接使用@CookieValue获取或者@RequestParam
   System.out.println(name);
   return null;
}
在本项目中:
   @RequestMapping("/to_list")
   public String toList(Model model,
                   @CookieValue(value = MiaoShaUserService.COOKIE_NAME_TOKEN,required = false) String cookieToken,
                   @RequestParam(value = MiaoShaUserService.COOKIE_NAME_TOKEN,required = false) String paramToken,
                   ){
      if(StringUtils.isEmpty(cookieToken) && StringUtils.isEmpty(paramToken)){
         return "login";
      }

      String token = StringUtils.isEmpty(paramToken) ? cookieToken : paramToken;
      // miaoShaUserService.getByToken 在redis中根据token取出user信息,同时延长过期时间
      MiaoShaUser user = miaoShaUserService.getByToken(response,token);
      model.addAttribute("user",user);

      return "goods_list";
   }
开发中很显然是使用注解@CookieValue(key)和@RequestParam(key)获取[一个是从cookie获取,一个是从request获取]
优化点一:使用WebMvcConfigurer中addArgumentResolvers方法(参数解析)
按照一般常理来是,上面的操作就可以了,每次都使用注解获取,但是有没有发现一个问题,这个注解很冗余啊,每次都要加注解,然后判断有没有token,属实麻烦,有没有可能在进入controller层前的拦截器阶段就给我自动捕获这个token???
本项目的代码:
首先建立一个config包,新建一个WebConfig类
获取cookie中的token
package com.imooc.miaosha.config;

import java.util.List;

import org.springframework.beans.factory.annotation.Autowired;
import org.springframework.context.annotation.Configuration;
import org.springframework.web.method.support.HandlerMethodArgumentResolver;
import org.springframework.web.servlet.config.annotation.InterceptorRegistry;
import org.springframework.web.servlet.config.annotation.WebMvcConfigurerAdapter;

import com.imooc.miaosha.access.AccessInterceptor;

@Configuration
//WebConfig继承了WebMvcConfigurerAdapter,会在controller层前进行处理重写的业务方法
public class WebConfig  extends WebMvcConfigurerAdapter{

    @Autowired
    // 自定义的参数解析类
    UserArgumentResolver userArgumentResolver;

    @Autowired
    // 自定义的拦截器类类
    AccessInterceptor accessInterceptor;

    @Override
    // 参数解析
    public void addArgumentResolvers(List<HandlerMethodArgumentResolver> argumentResolvers) {
        argumentResolvers.add(userArgumentResolver);
    }

    @Override
    // 拦截器
    public void addInterceptors(InterceptorRegistry registry) {
        registry.addInterceptor(accessInterceptor);
    }

}
然后自定义一个参数解析类UserArgumentResolver
package com.imooc.miaosha.config;

import org.springframework.beans.factory.annotation.Autowired;
import org.springframework.core.MethodParameter;
import org.springframework.stereotype.Service;
import org.springframework.web.bind.support.WebDataBinderFactory;
import org.springframework.web.context.request.NativeWebRequest;
import org.springframework.web.method.support.HandlerMethodArgumentResolver;
import org.springframework.web.method.support.ModelAndViewContainer;

import com.imooc.miaosha.access.UserContext;
import com.imooc.miaosha.domain.MiaoshaUser;
import com.imooc.miaosha.service.MiaoshaUserService;

@Service
public class UserArgumentResolver implements HandlerMethodArgumentResolver {

    @Autowired
    MiaoshaUserService userService;

    // 判断该请求是否需要处理
    public boolean supportsParameter(MethodParameter parameter) {
        Class<?> clazz = parameter.getParameterType();
        return clazz==MiaoshaUser.class;
    }

    // 需要处理的话在这里进行操作
    public Object resolveArgument(MethodParameter parameter, ModelAndViewContainer mavContainer,
            NativeWebRequest webRequest, WebDataBinderFactory binderFactory) throws Exception {
        // 这里的UserContext.getUser()是使用threadlocal捕获当前线程的用户
        return UserContext.getUser();
    }

}
在该类中保留参数解析后的成果,使用了ThreadLocal技术,UserContext.getUser()
package com.imooc.miaosha.access;

import com.imooc.miaosha.domain.MiaoshaUser;

public class UserContext {

    private static ThreadLocal<MiaoshaUser> userHolder = new ThreadLocal<MiaoshaUser>();

    public static void setUser(MiaoshaUser user) {
        userHolder.set(user);
    }

    public static MiaoshaUser getUser() {
        return userHolder.get();
    }

}
最后呢,直接在controller写下面代码就可以了,不用再用注解去获取cookie,判断token的user存在与否

```java
   @RequestMapping("/to_list")
   public String toList(Model model,MiaoShaUser user){
      model.addAttribute("user",user);
      return "goods_list";
   }
参考链接如下:
WebMvcConfigurer中addArgumentResolvers方法的使用
token鉴权开发
思考:上面的操作其实就是在做登录鉴权,使用的技术是token+threadlocal+redis技术,那么有必要使用参数解析这个方法嘛?直接使用拦截器机制不好嘛?
这里就引出了前后端分离的操作了,与jwt不同的是我们可以自定义token过期时间!
token+threadlocal+redis
定义拦截器AccessInterceptor
package com.imooc.miaosha.access;

import java.io.OutputStream;

import javax.servlet.http.Cookie;
import javax.servlet.http.HttpServletRequest;
import javax.servlet.http.HttpServletResponse;

import org.apache.commons.lang3.StringUtils;
import org.springframework.beans.factory.annotation.Autowired;
import org.springframework.stereotype.Service;
import org.springframework.web.method.HandlerMethod;
import org.springframework.web.servlet.handler.HandlerInterceptorAdapter;

import com.alibaba.fastjson.JSON;
import com.imooc.miaosha.domain.MiaoshaUser;
import com.imooc.miaosha.redis.AccessKey;
import com.imooc.miaosha.redis.RedisService;
import com.imooc.miaosha.result.CodeMsg;
import com.imooc.miaosha.result.Result;
import com.imooc.miaosha.service.MiaoshaUserService;

@Service
public class AccessInterceptor  extends HandlerInterceptorAdapter{

    @Autowired
    MiaoshaUserService userService;

    @Autowired
    RedisService redisService;

    @Override
    // 拦截器前处理
    public boolean preHandle(HttpServletRequest request, HttpServletResponse response, Object handler)
            throws Exception {
        if(handler instanceof HandlerMethod) {
            MiaoshaUser user = getUser(request, response);
            UserContext.setUser(user);
            HandlerMethod hm = (HandlerMethod)handler;
            // 这里做了接口防刷的策略
            AccessLimit accessLimit = hm.getMethodAnnotation(AccessLimit.class);
            if(accessLimit == null) {
   return true;
            }
            int seconds = accessLimit.seconds();
            int maxCount = accessLimit.maxCount();
            boolean needLogin = accessLimit.needLogin();
            String key = request.getRequestURI();
            if(needLogin) {
   if(user == null) {
       render(response, CodeMsg.SESSION_ERROR);
       return false;
   }
   key += "_" + user.getId();
            }else {
   //do nothing
            }
            AccessKey ak = AccessKey.withExpire(seconds);
            Integer count = redisService.get(ak, key, Integer.class);
        if(count  == null) {
      redisService.set(ak, key, 1);
        }else if(count < maxCount) {
      redisService.incr(ak, key);
        }else {
            render(response, CodeMsg.ACCESS_LIMIT_REACHED);
            return false;
        }
        }
        return true;
    }

    private void render(HttpServletResponse response, CodeMsg cm)throws Exception {
        response.setContentType("application/json;charset=UTF-8");
        OutputStream out = response.getOutputStream();
        String str  = JSON.toJSONString(Result.error(cm));
        out.write(str.getBytes("UTF-8"));
        out.flush();
        out.close();
    }

    private MiaoshaUser getUser(HttpServletRequest request, HttpServletResponse response) {
        String paramToken = request.getParameter(MiaoshaUserService.COOKI_NAME_TOKEN);
        String cookieToken = getCookieValue(request, MiaoshaUserService.COOKI_NAME_TOKEN);
        if(StringUtils.isEmpty(cookieToken) && StringUtils.isEmpty(paramToken)) {
            return null;
        }
        String token = StringUtils.isEmpty(paramToken)?cookieToken:paramToken;
        return userService.getByToken(response, token);
    }

    private String getCookieValue(HttpServletRequest request, String cookiName) {
        Cookie[]  cookies = request.getCookies();
        if(cookies == null || cookies.length <= 0){
            return null;
        }
        for(Cookie cookie : cookies) {
            if(cookie.getName().equals(cookiName)) {
   return cookie.getValue();
            }
        }
        return null;
    }

}
然后在在webconfig类中注册该拦截器即可,在前后端分离过程中还要放行相关的静态资源。
现在主流的前后端分离token鉴权方式还是jwt+threadlocal+redis,这块代码知识可以百度得到
@Override
    // 拦截器
    public void addInterceptors(InterceptorRegistry registry) {
        registry.addInterceptor(accessInterceptor);
    }
(三)秒杀开发
连表查询小技巧
商品表和秒杀商品表是两个互相独立的表,其中的关联为goods_id,但是我要返回的对象,既想要商品表中的字段,又想要秒杀商品表中的字段,然后返回给前端,那该怎么办???很简单秒杀商品表继承一下商品表的字段,然后加入我们字节想要的字段即可!!!有点优秀!
@Data
public class GoodsVo extends Goods {
    // 返回给前端的vo层,除了商品表原有字段后,再增加了自己想要的四个字段!
    // 这四个字段肯定是前端所需要的
   private Double miaoshaPrice;
   private Integer stockCount;
   private Date startDate;
   private Date endDate;
}
接下来就是写一个GoodsDao,去crud,这里需要两个方法:查询所有商品(使用左连表查询语句)和根据商品id获取商品所有信息
public interface GoodsDao {

   /**
    * 查询秒杀商品列表
    * @return
    */
   public List<GoodsVo> listGoodsVo();

   /**
    * 根据商品id获取商品所有信息
    * @param goodsId
    * @return
    */
   GoodsVo getGoodsVoByGoodsId(@Param("goodsId") long goodsId);
}
查询sql语句,使用左连表查询
 <select id="listGoodsVo" resultType="com.javan.seckill.vo.GoodsVo">
      select g.*,mg.stock_count,mg.start_date,mg.end_date,mg.miaosha_price
      from miaosha_goods mg
      left join goods g
      on mg.goods_id = g.id
   </select>

   <select id="getGoodsVoByGoodsId" resultType="com.javan.seckill.vo.GoodsVo">
      select g.*,mg.stock_count,mg.start_date,mg.end_date,mg.miaosha_price
      from miaosha_goods mg
             left join goods g
                     on mg.goods_id = g.id
      where g.id = #{goodsId}
   </select>
controller层返回数据
   @RequestMapping("to_detail/{goodsId}")
   public String toDetail(Model model, MiaoShaUser user, @PathVariable("goodsId") long goodsId){
        ...
}
@RequestMapping指定的映射URL,其中有用{}括起来的参数,在方法的形参处,用@PathVariable注解对其进行获取
实际上,在后端开发中不应该返回String类型(这里是thymeleaf开发),而是返回result封装好的类
秒杀功能实现逻辑(重点)
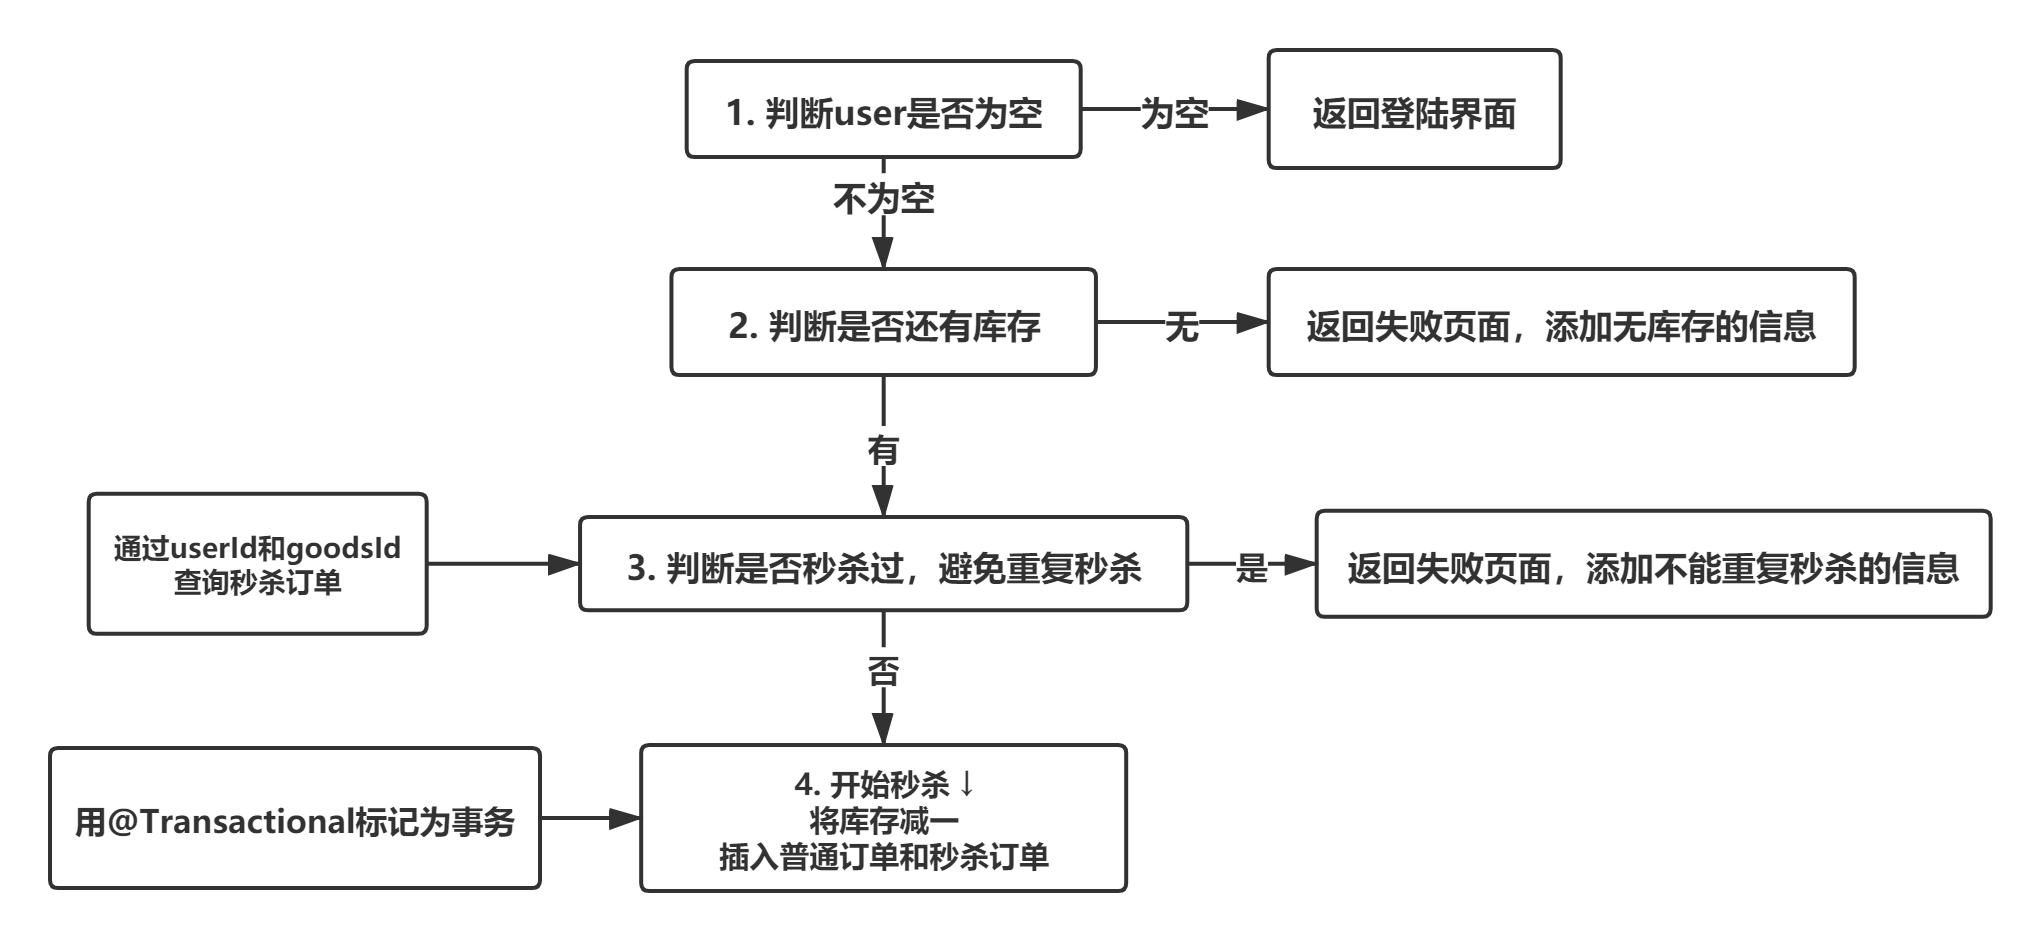
这里要注意就是减少库存和创建订单,这两个是一个事务,要具备原子性,所以要用注解@Transactional在,同时还要考虑的是减少库存在高并发条件下如何防止超卖。
如果是同一个用户发送了两次秒杀请求,这个请求是同步的,很巧妙的避开了秒杀是否成功这个业务,所以最后生成的2条订单,2条秒杀订单。如何避免超买???
解决办法:我们再秒杀订单表中,将userId和goodsId创建 唯一索引
但凡有两条一样的数据,整体的业务就会回滚,保证了一个人一条秒杀订单
秒杀场景下超卖问题解决方案
在本项目中前期使用了数据库悲观锁之排他锁(sql语句加入 where count > 0 )本质是update造成的行级锁,后期使用了redis+rabbitmq(缓存方案,先在缓存中完成计数,也就是预减库存,然后再通过消息队列异步地入库)redis由于其高速+单进程模型,省掉了很多并发的问题,所以可以被选来进行高速秒杀的工作。
(四)秒杀压测
分为windows压测和linux压测。windows本地压测比较简单,关注QPS即可,重点学习下linux下的压测方法
首先在linux下下载好压测工具jmeter(linux版本)和redis压测工具(redis-benchmark)
#100个并发连接,100000个请求
redis-benchmark -h 127.0.0.1 -p 6379 -c 100 -n 100000

#存取大小为100字节的数据包
redis-benchmark -h 127.0.0.1 -p 6379 -q -d 100

#测试set和lpush命令的QPS,其中-q为简化输出
redis-benchmark -t set,lpush -q -n 1000000

#测试单条命令的QPS
redis-benchmark -n 100000 -q script load "redis.call('set','foo','bar')"
在Windows目录下写好jmx文件
命令行:sh jmeter.sh -n -t xxx.jmx -l result.jtl
再将result.jtl导入到windows 下的jmeter中查看QPS
(五)页面级优化(加入redis缓存)
这一章节主要讲解优化思路:页面缓存、url缓存、页面静态化(就是前后端分离了)、对象缓存(将用户的信息放入到redis中,弊端:每次修改用户信息的时候还要更新缓存)。在真实的开发中都是前后端分离的时代了,所以现在这个了解即可!
页面缓存
URL缓存
其他方式:CDN优化+静态资源的压缩
页面静态化:由于没有用到Vue,所以这里使用原生的ajax请求取获取后端数据,前端使用jquery操作dom的方式渲染html,这样页面就可以直接缓存到客户端了,不需要与服务器交互就能访问页面(数据需要和服务器交互)
后端代码:
   @RequestMapping(value = "/detail/{goodsId}")
   @ResponseBody
   public Result<GoodsDetailVo> toDetail(HttpServletRequest request, HttpServletResponse response, Model model, MiaoShaUser user, @PathVariable("goodsId") long goodsId){

      GoodsVo goodsVo = goodsService.getGoodsVoByGoodsId(goodsId);

      //秒杀开始、结束时间,当前时间
      long startDate = goodsVo.getStartDate().getTime();
      long endDate = goodsVo.getEndDate().getTime();
      long now = System.currentTimeMillis();

      //秒杀状态,0为没开始,1为正在进行,2为秒杀已经结束
      int miaoshaStatus = 0;
      //距离秒杀剩余的时间
      int remainSeconds = 0;

      if(now < startDate){
         //秒杀没开始,进行倒计时
         remainSeconds = (int) (startDate - now) / 1000;
      }else if(now > endDate){
         //秒杀已经结束
         miaoshaStatus = 2;
         remainSeconds = -1;
      }else {
         //秒杀进行时
         remainSeconds = 0;
         miaoshaStatus = 1;
      }
      GoodsDetailVo goodsDetailVo = new GoodsDetailVo();
      goodsDetailVo.setGoods(goodsVo);
      goodsDetailVo.setUser(user);
      goodsDetailVo.setMiaoshaStatus(miaoshaStatus);
      goodsDetailVo.setRemainSeconds(remainSeconds);

      return Result.success(goodsDetailVo);
   }
vo层:
@Data
public class GoodsDetailVo {
   private long miaoshaStatus;
   private long remainSeconds;
   private GoodsVo goods;
   private MiaoShaUser user;
}
对应前端:
我们从商品列表页面跳转到商品详情页,修改为如下
注意其中/goods_detail.htm,它是放在static目录下的静态资源,为了防止视图解析器的跳转,将html写为htm,其中goodsId是给前端页面的隐藏输入框传递参数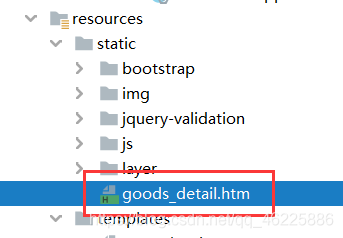
在application.properties中配置
# static
spring.resources.add-mappings=true
spring.resources.cache.period= 3600 #缓存时间
spring.resources.chain.cache=true
spring.resources.chain.enabled=true
#spring.resources.chain.gzipped=true
spring.resources.chain.html-application-cache=true
spring.resources.static-locations=classpath:/static/
(六)服务级优化(加入Rabbitmq)
SpringBoot集成Rabbitmq
提前在云服务器上安装好rabbitmq(使用docker安装)
首先添加maven依赖包
<dependency>
        <groupId>org.springframework.boot</groupId>
        <artifactId>spring-boot-starter-amqp</artifactId>
    </dependency>
然后添加配置信息
#rabbitmq
spring.rabbitmq.host=114.132.248.249
spring.rabbitmq.port=5672
spring.rabbitmq.username=guest
spring.rabbitmq.password=guest
spring.rabbitmq.virtual-host=/
#\u6D88\u8D39\u8005\u6570\u91CF
spring.rabbitmq.listener.simple.concurrency= 10
spring.rabbitmq.listener.simple.max-concurrency= 10
#\u6D88\u8D39\u8005\u6BCF\u6B21\u4ECE\u961F\u5217\u83B7\u53D6\u7684\u6D88\u606F\u6570\u91CF
spring.rabbitmq.listener.simple.prefetch= 1
#\u6D88\u8D39\u8005\u81EA\u52A8\u542F\u52A8
spring.rabbitmq.listener.simple.auto-startup=true
#\u6D88\u8D39\u5931\u8D25\uFF0C\u81EA\u52A8\u91CD\u65B0\u5165\u961F
spring.rabbitmq.listener.simple.default-requeue-rejected= true
#\u542F\u7528\u53D1\u9001\u91CD\u8BD5
spring.rabbitmq.template.retry.enabled=true
spring.rabbitmq.template.retry.initial-interval=1000
spring.rabbitmq.template.retry.max-attempts=3
spring.rabbitmq.template.retry.max-interval=10000
spring.rabbitmq.template.retry.multiplier=1.0
接下进行简单测试,是否可以连接,是否可以正常传送消息。
创建配置类:
@Configuration
public class MQConfig {

   public static final String QUEUE_NAME = "queue";

   @Bean
   public Queue queue(){
      return new Queue(QUEUE_NAME,true);
   }
}
@Bean注解就是要告诉方法,产生一个Bean对象,并将这个Bean由Spring容器管理。产生这个Bean对象的方法Spring只会调用一次,随后这个Bean将放在IOC容器中。 SpringIOC容器管理一个或者多个Bean,这些Bean都需要在@Configuration注解下进行创建
创建消息的接收器:
@Service
@Slf4j
public class MQReceiver {

   @RabbitListener(queues = MQConfig.QUEUE_NAME)
   public void receive(String message){
      log.info("receive message:" + message);
   }
}
@RabbitListener,其中queues属性通过识别队列的名字来接受消息进行消费
创建消息的发送器:
@Service
@Slf4j
public class MQSender {

   @Autowired
   //AmqpTemplate接口定义了发送和接收消息的基本操作
   AmqpTemplate amqpTemplate;

   public void send(Object message){
      String msg = RedisService.beanToString(message);
      log.info("send message:" + msg);
      amqpTemplate.convertAndSend(MQConfig.QUEUE_NAME,msg);
   }
}
关于rabbitmq涉及到交换机等等概念,可以细看rabbitmq笔记
秒杀接口优化思路
接口优化,实质上就是去减少数据库的访问
1.系统初始化时,将秒杀商品库存加载到Redis中
2.收到请求,在Redis中预减库存,库存不足时,直接返回秒杀失败
3.秒杀成功,将订单压入消息队列,返回前端消息“排队中”(像12306的买票)
4.消息出队,生成订单,减少库存
5.客户端在以上过程执行过程中,将一直轮询是否秒杀成功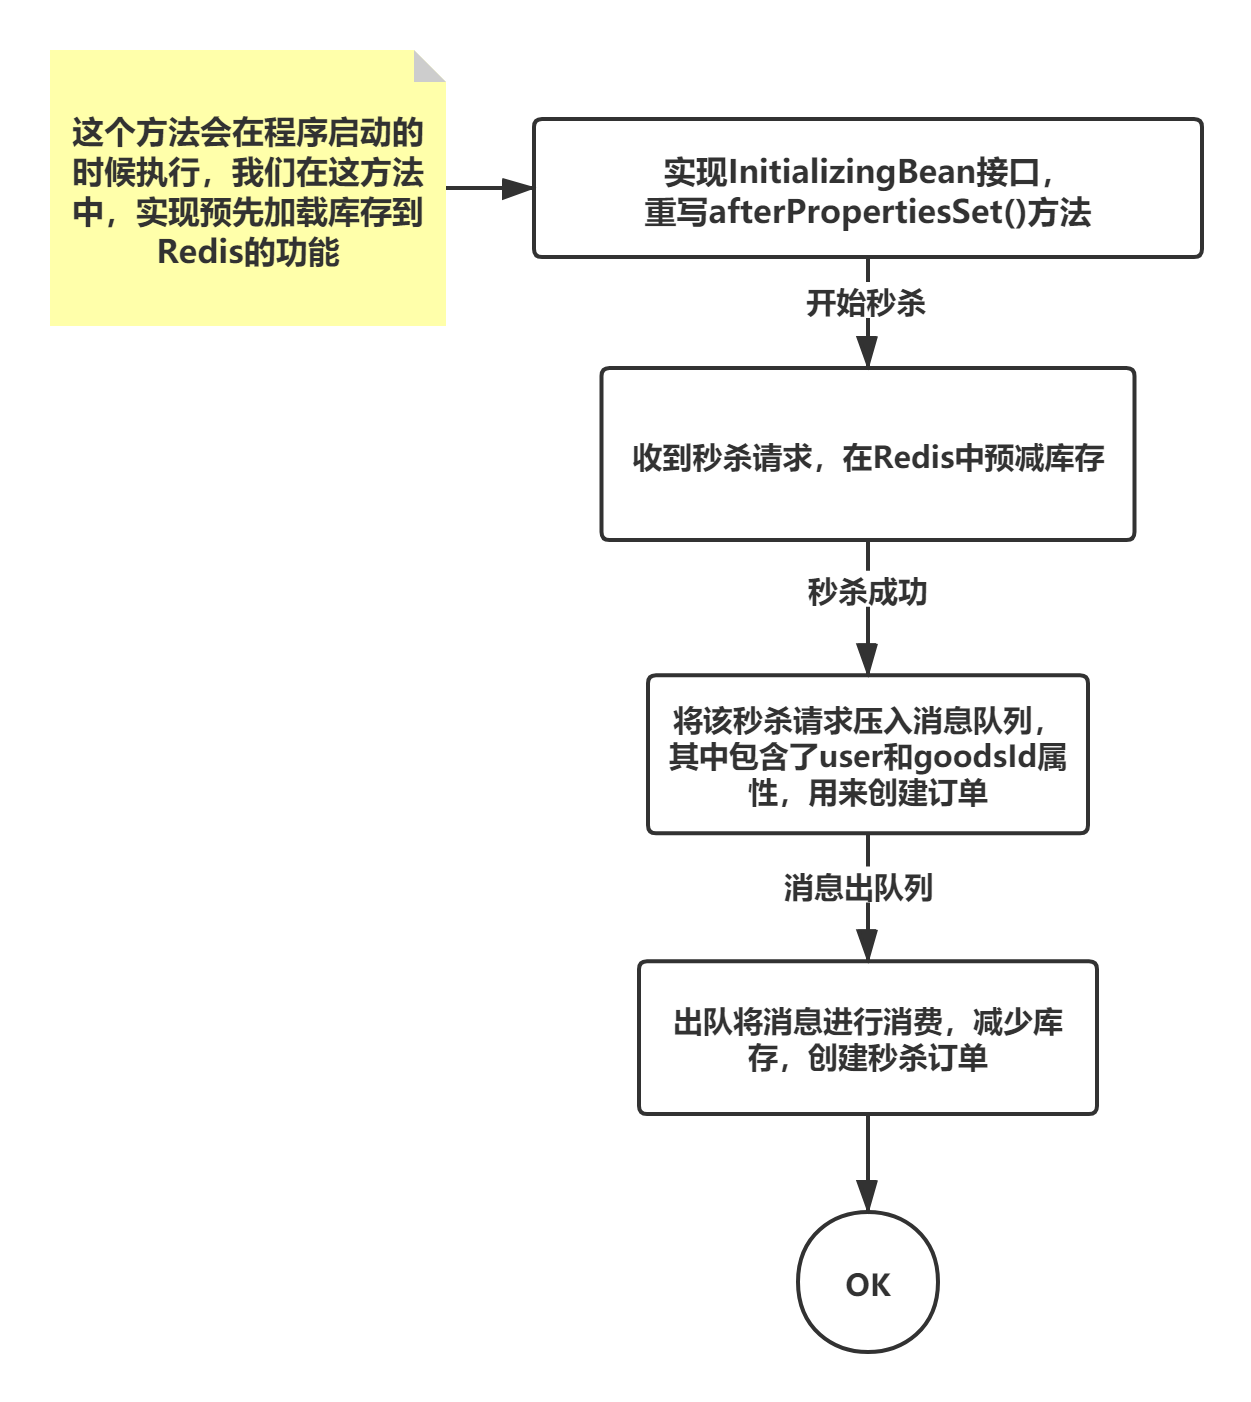
库存预加载到Redis中
这里我们是通过实现InitialzingBean接口,重写其中afterProperties方法达成的
public class MiaoshaController implements InitializingBean {
    @Override
   public void afterPropertiesSet() throws Exception {
      //系统启动的时候,就将数据存入Redis

      //加载所有秒杀商品
      List<GoodsVo> goodsVos = goodsService.listGoodsVo();
      if(goodsVos == null)
         return;
      //存入Redis中,各秒杀商品的数量
      for (GoodsVo good : goodsVos){
         redisService.set(GoodsKey.miaoshaGoodsStockPrefix,""+good.getId(),good.getStockCount());
         map.put(good.getId(),false);
      }

   }

    ......
}
1.我们先从数据库中将秒杀商品的信息读取出来,再一个一个加载到缓存中
2.注意一下其中有一个map,它添加了对应Id-false的键值对,它表示的是该商品没有被秒杀完,用于下文中,当商品秒杀完,阻止其对redis服务的访问(后文还会提到)
开始秒杀,预减库存
      //user不能为空,空了去登陆
      if(user == null){
         return Result.error(CodeMsg.SESSION_ERROR);
      }

      //HashMap内存标记,减少Redis访问时间
      boolean over = map.get(goodsId);
      if(over)
         return Result.error(CodeMsg.MIAO_SHA_OVER);

      //收到请求,预减库存
      Long count = redisService.decr(GoodsKey.miaoshaGoodsStockPrefix, "" + goodsId);
      if(count <= 0){
         map.put(goodsId,true);
         return Result.error(CodeMsg.MIAO_SHA_OVER);
      }
1.首先用户不能为空
2.这里我们又看见了map,它写在了Redis服务前边,当商品秒杀完毕的时候,这样就能防止它再去访问Redis服务了
3.预减库存,库存小于0的时候就返回秒杀失败
加入消息队列中(Direct Exchange)
      //判断是否已经秒杀过了
      MiaoshaOrder miaoshaOrder = orderService.selectMiaoshaOrderByUserIdGoodsId(user.getId(), goodsId);
      if(miaoshaOrder != null)
         return Result.error(CodeMsg.REPEATE_MIAOSHA);

      //加入消息队列
      MiaoshaMessage miaoshaMessage = new MiaoshaMessage();
      miaoshaMessage.setGoodsId(goodsId);
      miaoshaMessage.setMiaoShaUser(user);
      mqSender.sendMiaoshaMessage(miaoshaMessage);
1.在其之前我们有一个判断,判断该用户是不是重复秒杀,其实这一步是多余的,因为我们在数据库中已经建立了唯一索引,将userId和GoodsId绑定在了一起,不会生成重复的订单
2.自定义MiaoshaMessage类,创建对象,其中加入我们想要的user和goodsId信息,并将消息发出去
消息发送过程
   @Autowired
   // 用SpringBoot框架提供的AmqpTemlplate实例来为我们的秒杀队列发送消息
   AmqpTemplate amqpTemplate;


   public void sendMiaoshaMessage(MiaoshaMessage miaoshaMessage){
      String msg = RedisService.beanToString(miaoshaMessage);
      log.info("miaosha send msg:" + msg);
      amqpTemplate.convertAndSend(MQConfig.MIAOSHA_QUEUE,msg);
   }
消息出队处理
判断库存是否还有,有的话,向下执行秒杀
   @RabbitListener(queues = MQConfig.MIAOSHA_QUEUE)
   public void receiveMiaoshaMsg(String miaoshaMessage){
      log.info("miaosha receive msg:" + miaoshaMessage);
      MiaoshaMessage msg = RedisService.stringToBean(miaoshaMessage, MiaoshaMessage.class);

      long goodsId = msg.getGoodsId();
      MiaoShaUser miaoShaUser = msg.getMiaoShaUser();
      GoodsVo goodsVo = goodsService.getGoodsVoByGoodsId(goodsId);

      //判断库存
      int stock = goodsVo.getStockCount();
      if(stock < 0)
         return;

      //有库存而且没秒杀过,开始秒杀
      miaoshaService.miaosha(miaoShaUser,goodsVo);
   }
秒杀方法
   @Transactional
   public OrderInfo miaosha(MiaoShaUser user, GoodsVo goods) {
      //库存减一
      boolean success = goodsService.reduceStock(goods);

      if(success)
         //下订单
         return orderService.createOrder(user,goods);
      else{
         setGoodsOver(goods.getId());
         return null;
      }
   }
1.该方法我们用@Transactional注解标记,保证减库存和下订单都执行成功
2.注意其中有一个setGoodsOver()方法,它的作用是当该商品库存没有的时候,在redis中存一个标志,
private void setGoodsOver(Long goodsId) {
        redisService.set(MiaoshaKey.isGoodsOver, ""+goodsId, true);
    }
这里写了一个/resulet请求,前端会根据返回值,来判断秒杀的状态
   /**
    * orderId 成功
    * -1 秒杀失败
    * 0 继续轮询
    * @param miaoShaUser
    * @param goodsId
    * @return
    */
   @RequestMapping(value = "/result",method = RequestMethod.GET)
   @ResponseBody
   public Result<Long> miaoshaResult(MiaoShaUser miaoShaUser,
                             @RequestParam("goodsId")long goodsId){
      if(miaoShaUser == null)
         return Result.error(CodeMsg.SESSION_ERROR);

      long result = miaoshaService.getMiaoshaResult(miaoShaUser.getId(),goodsId);
      return Result.success(result);
   }
getMiaoshaResult方法:
   public long getMiaoshaResult(long userId, long goodsId) {
      MiaoshaOrder order = orderService.selectMiaoshaOrderByUserIdGoodsId(userId, goodsId);

      if(order != null){
         //秒杀成功
         return order.getOrderId();
      }else {
         boolean isOver = getGoodsOver(goodsId);
         if(isOver)
            return -1;
         else
            //继续轮询
            return 0;
      }
   }
1.用户在秒杀该商品的过程中,在得到秒杀结果之前,会一直进行轮询,直到返回orderId或者-1来告知秒杀成功与失败
2.该方法中,从数据库中看看能不能查询到秒杀订单信息,有说明秒杀成功,返回订单号;失败了则获取redis中的是否秒杀完的标志,跟前边setGoodsOver()相对应,这里的getGoodsOver()便是对set的值进行获取,如果没有库存了则说明秒杀失败了,否则要继续轮询了(已经秒杀到,但是订单还没有创建完成)
(七)图形验证码及恶意防刷
图形验证码
我们在立即秒杀按钮处添加验证码,防止机器人对我们的系统进行多次秒杀,也可以使秒杀能够错峰访问,削减并发量本项目采用的是ScriptEngine,但是实际上开发是使用kaptcha较多!这里只是了解,使用kaptcha来进行重构!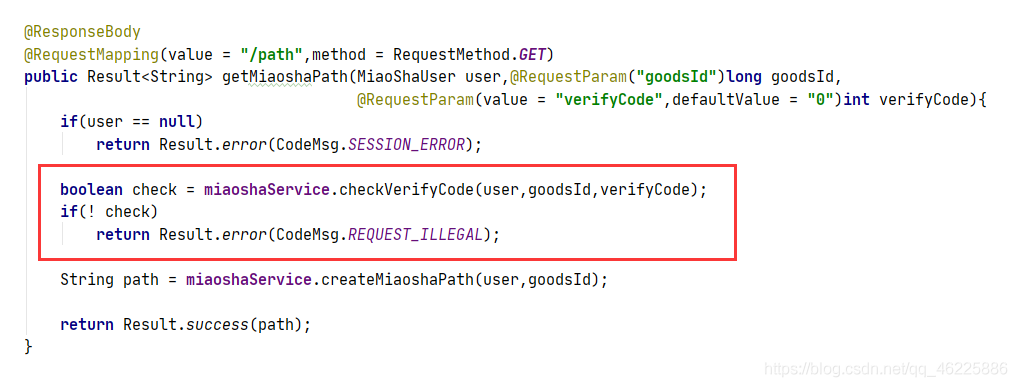
在该方法中,实现的是将从前端获取的验证码与Redis存储的验证码进行验证,验证完成之后,就将它从Redis中移除,方法代码如下
在此之前,前端验证码会和后端有一个响应,每次刷新验证码都会将其的正确结果同步到服务器的Redis上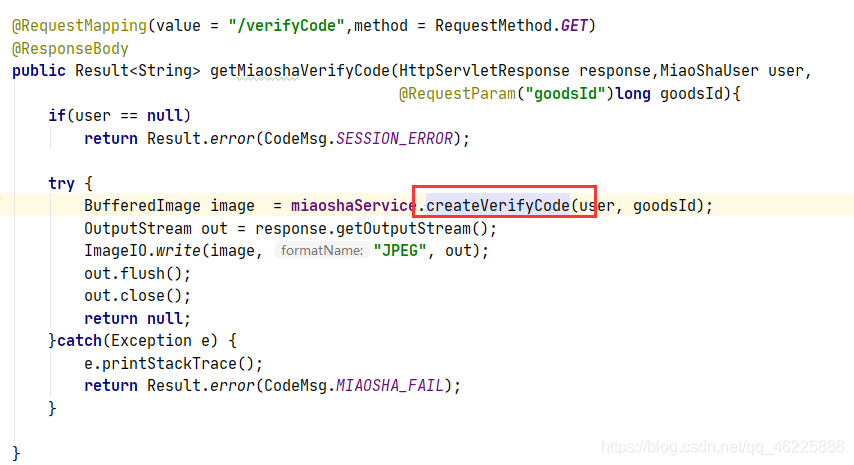
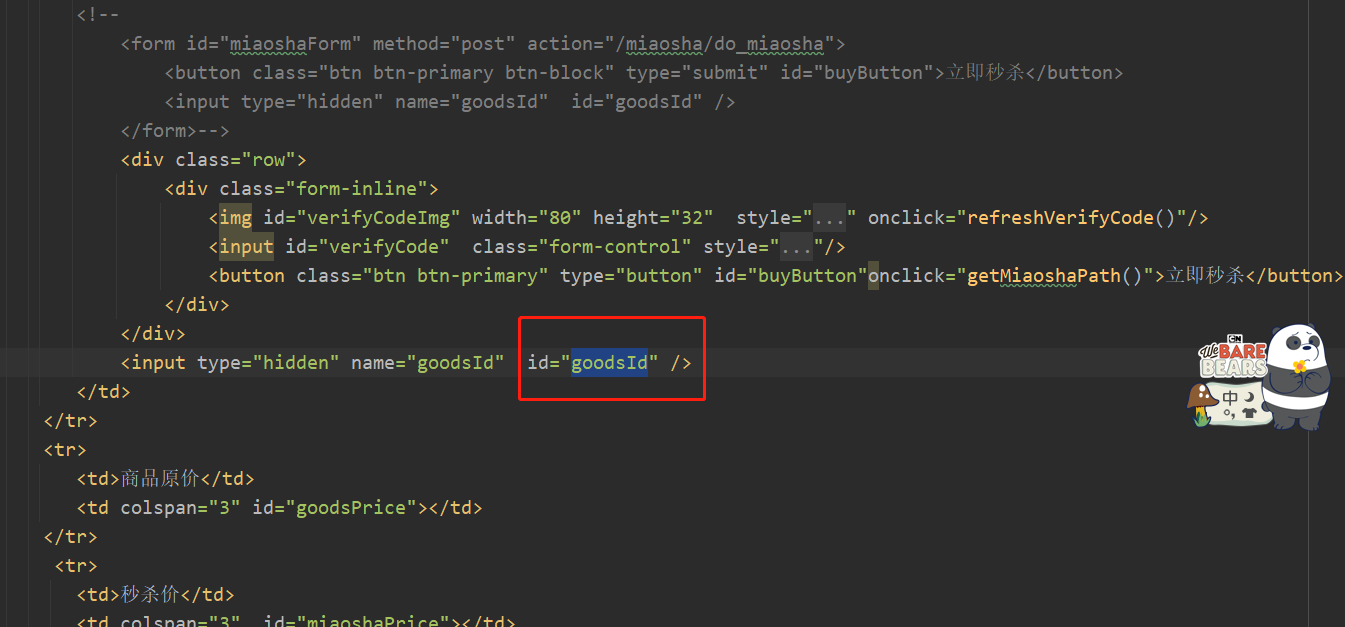
恶意防刷:动态秒杀地址
之前我们实现秒杀的时候是直接跳转到秒杀接口,使得我们每次的秒杀地址都是一样的,这样具有安全隐患,所以,我们将其改为动态地址,通过在前端上写一个方法进行跳转,如下所示。
它会先跳转到/miaosha/path,获取秒杀地址中的path值,将其存储在Redis中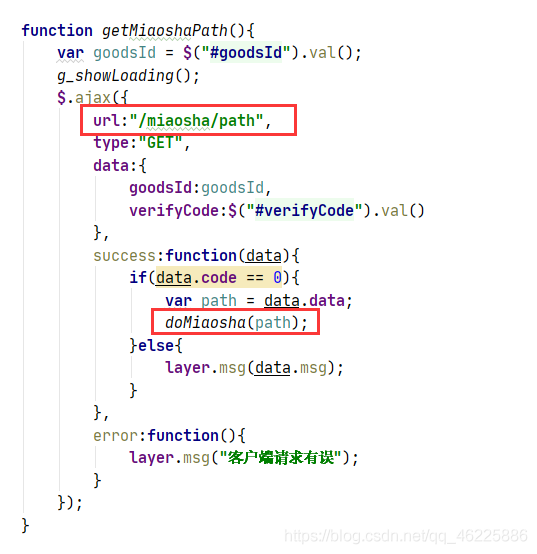
然后携带path值去访问真正的秒杀方法,在其中将path值与Redis中的值进行比较,一致才能继续秒杀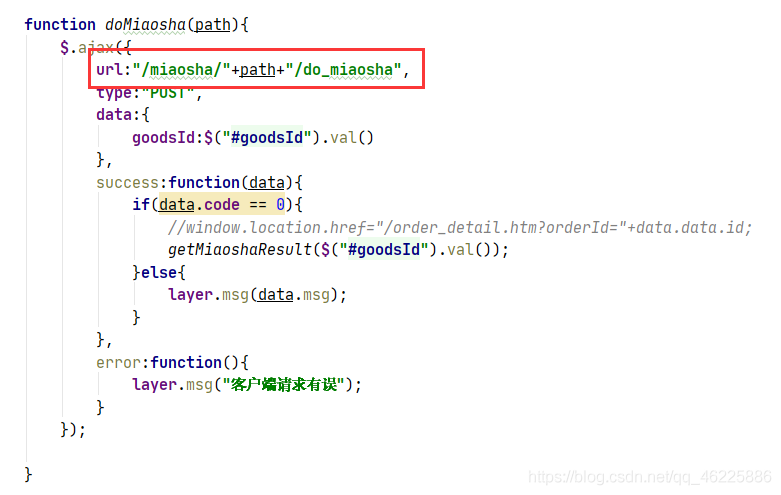
获取路径的Java代码:
   @ResponseBody
   @RequestMapping(value = "/path",method = RequestMethod.GET)
   public Result<String> getMiaoshaPath(MiaoShaUser user,@RequestParam("goodsId")long goodsId,
                               @RequestParam(value = "verifyCode",defaultValue = "0")int verifyCode){
      if(user == null)
         return Result.error(CodeMsg.SESSION_ERROR);


      String path = miaoshaService.createMiaoshaPath(user,goodsId);

      return Result.success(path);
   }
先调用createMiaoshaPath()方法,在其中会创建一串随机值,并且存储到Redis中,具体方法如下,执行完之后将路径值返回到前端
   public String createMiaoshaPath(MiaoShaUser user, long goodsId) {
      if(user == null || goodsId <= 0)
         return null;

      String str = MD5Util.md5(UUIDUtil.getUUID());
      redisService.set(MiaoshaKey.miaoshaPathPrefix,user.getId() + "_" + goodsId,str);

      return str;
   }
执行秒杀接口的修改:
路径上,我们采用了RestFul风格,通过@PathVariable注解获取其中的路径值,并与redis服务器中的值进行比较,一致才能向下一步继续执行
恶意防刷:接口限流
接口限流防刷的作用是在规定的时间内访问固定的次数。我们实现的思路是,在要限制防刷的方法上添加注解,通过拦截器进行限制访问次数
创建出这个注解:
该注解中,包含了需要访问时间内的访问次数,以及判断是否需要登录
@Retention(RetentionPolicy.RUNTIME)
@Target(ElementType.METHOD)
public @interface AccessLimit {
   int seconds();
   int maxCount();
   boolean needLogin() default true;
}
对我们想要限流的方法进行标记:
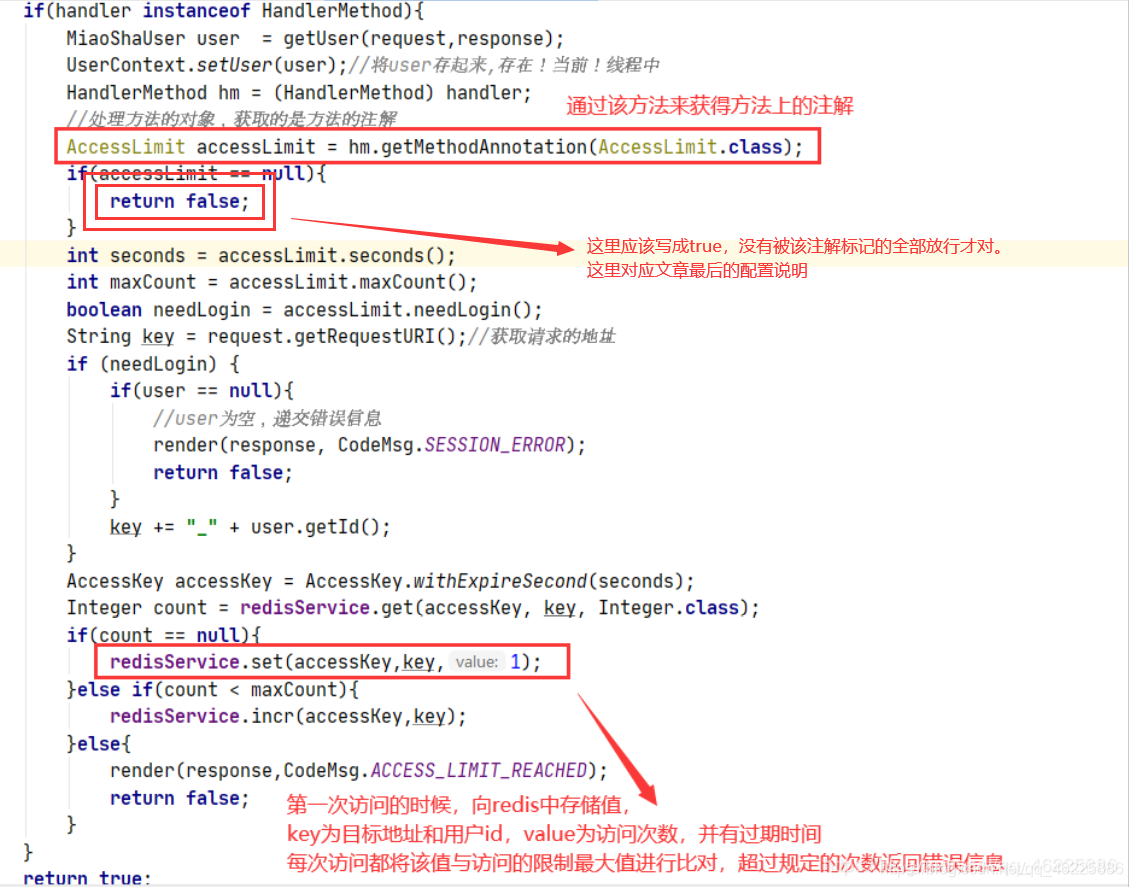
创建拦截器:
public class AccessInterceptor extends HandlerInterceptorAdapter {

   @Autowired
   MiaoShaUserService userService;
   @Autowired
   RedisService redisService;

   @Override
   public boolean preHandle(HttpServletRequest request, HttpServletResponse response, Object handler) throws Exception {

      if(handler instanceof HandlerMethod){
         MiaoShaUser user  = getUser(request,response);
         UserContext.setUser(user);
         HandlerMethod hm = (HandlerMethod) handler;
         //处理方法的对象,获取的是方法的注解
         AccessLimit accessLimit = hm.getMethodAnnotation(AccessLimit.class);
         if(accessLimit == null){
            return false;
         }
         int seconds = accessLimit.seconds();
         int maxCount = accessLimit.maxCount();
         boolean needLogin = accessLimit.needLogin();
         String key = request.getRequestURI();//获取请求的地址
         if (needLogin) {
            if(user == null){
               //user为空,递交错误信息
               render(response, CodeMsg.SESSION_ERROR);
               return false;
            }
            key += "_" + user.getId();
         }
         AccessKey accessKey = AccessKey.withExpireSecond(seconds);
         Integer count = redisService.get(accessKey, key, Integer.class);
         if(count == null){
            redisService.set(accessKey,key,1);
         }else if(count < maxCount){
            redisService.incr(accessKey,key);
         }else{
            render(response,CodeMsg.ACCESS_LIMIT_REACHED);
            return false;
         }
      }
      return true;
   }
    ......
}
最后配置一下
@Configuration
public class WebConfig extends WebMvcConfigurerAdapter{

   @Autowired
   UserArgumentResolver userArgumentResolver;
   @Autowired
   AccessInterceptor accessInterceptor;

   @Override
   public void addArgumentResolvers(List<HandlerMethodArgumentResolver> argumentResolvers) {
      super.addArgumentResolvers(argumentResolvers);
      argumentResolvers.add(userArgumentResolver);
   }

   @Override
   public void addInterceptors(InterceptorRegistry registry) {
      InterceptorRegistration interceptorRegistration = registry.addInterceptor(accessInterceptor);
      interceptorRegistration.addPathPatterns("/miaosha/path");

   }
}
在这个配置类中,我们重写的是addInterceptors方法,将拦截器注入进来,加到配置中,(指定要拦截的地址这一步可以省略掉了,因为我们使用的是注解标记,前边有一处写错,开始写的是没有注解的话,返回false,这样全局都被拦截了,应该写成true,这样才能放行)
(八)面试题
1. 库存预加载到Redis中是怎么实现的?
我是通过实现InitializingBean接口,重写其中afterPropertiesSet()方法,实现的预加载
1.1 之后主动添加秒杀商品的话,怎么添加?
通过后台管理进行添加,修改redis缓存和数据库中的值
2. 在Redis中扣减库存的时候,是怎么保证线程安全,防止超卖的?
redis中有一个decr()方法,它实现的是递减操作,而且能够保证原子性
3. 如果出现Redis缓存雪崩、穿透,怎么解决?
雪崩就是缓存中我存储的值全部都失效了,请求直接打到数据库上,请求过大,数据库扛不住。可以用设置这些热点数据永不失效,或者是设置一个随机的过期时间,这样来避免它同时失效。
缓存穿透是缓存和数据库中都没有的数据,如果有人利用这些数据高并发的访问的话,对数据库压力也很大。可以对数据比如它的id值进行一个校验,避免这些不存在的值对数据库进行访问或者是使用布隆过滤器,它的原理是通过高效的数据结构查询数据库中是否存在这个值,不存在的时候,就直接返回,存在的话才会访问到数据库。
4. 限流防刷是怎么实现的?
限流防刷我是通过拦截器来实现的,我自定义了一个注解,它实现的功能就是标记在方法上,规定它单位时间内的访问次数,如果超过要求的话,就会被拦截。
拦截器我是继承的HandlerInterceptorAdapter,重写的是preHandle方法,在该方法中,将访问次数同步到Redis中,这个键值对是存在有效期的。最后还要把拦截器配置到项目中,继承WebMvcConfigurerAdapter,重写addInterceptors()方法
5. 对于用户的恶意下单,他知道了你的URL地址,不停的刷,怎么办?
我是通过隐藏URL地址来避免这种问题的,当访问秒杀接口的时候,会先从后端生成一个随机的字符串,然后保存到redis中,并且拼接到URL地址上,这样再去访问秒杀的接口,通过RestFul风格的地址,获取其中的随机字符串,与redis中的进行比对,一致的话,才能继续向下访问
6. 秒杀成功后是怎么同步到数据库中的?
通过两步,一步是减少商品库存,第二步是创建秒杀订单。
6.1 减库存成功,创建秒杀订单失败了怎么办?
这两步过程在一个事务中执行,然后先减少库存,它有一个成功的标志,减少库存成功了,才去执行创建订单的操作
6.2 Spring默认的事务隔离级别
默认情况下Spring使用的是数据库设置的默认隔离级别,应该是可重复读
7. RabbitMQ怎么提高消息的高可用?
我在创建队列实例的时候,将其创建为可持久化的,它有一个durable属性设置为true,这样,RabbitMQ服务重启的情况下,也不会丢失消息。
8. 说说volatile关键字儿
它最重要的一点就是保证了变量的可见性。我想先说说JMM(java内存模型),每个线程有自己的工作内存,另外还存在一个主内存,线程从主内存中获取值存储在自己的工作内存中,当对变量进行修改,它不会立即将其同步到主内中,这个时候若有其他线程来从主内存中获取该变量的时候,就会发生脏读的现象,若被volatile标记的话,就能保证变量的可见性,当变量被修改的时候他就会将其立即同步到主内存中。
9. TCP和UDP的区别
TCP是需要通过三次握手建立连接的;UDP是无连接的
TCP提供的可靠性高;UDP的不保证可靠性,一般用于直播或者是语音通话
TCP是基于字节流的传输层协议,它比较慢;UDP比较快
10. ArrayList
底层是数组,查询快,增删慢
它的默认大小是10,添加值的时候会先对当前数组大小和总大小进行判断,若出现超过最大容量的话,就要进行扩容,扩容的大小是原来大小的1.5倍(右移运算符,右移1位),再将之前的数据复制到新的数组里边。


评论
登录后即可评论
分享你的想法,与作者互动
暂无评论